Opt-in features are something that is not really well supported by Azure AD (especially in the v1 endpoint). In this article we will explore how we could implement one in a good way. Let’s start with an explanation of the case so you understand what kind of feature we require and what problems are associated with it.
Case introduction
ContractZen is a SaaS application for contract, meeting, and corporation management, which we are developing together with the Helsinki-based startup, ContractZen. Read more about ContractZen on the customer page and the ContractZen homepage.
An often requested feature was to get notifications for e.g. contracts expiring to users’ Outlook calendars in Office 365. This way the users can get notifications on things important to them right inside Outlook.
So we needed to add a calendar integration feature to which users can opt-in. A background job would add important events to the user’s calendar as needed.
The problem is that required permissions in Azure AD must be consented fully. This feature should be opt-in, but if we require it on the existing app, every user must consent to the calendar access. If we don’t use the user’s calendar, we should not require access to it.
The suggested solution
We suggest the following solution to this problem. Create a second application in Azure AD just for the calendar integration. We will only require delegated permissions for calendar read/write on the Microsoft Graph API on it. Since the permission requirement does not exist in the main app for ContractZen, users are not required to consent to it by default.
But why delegated permissions? Because application permissions are organization-wide. If we went through that route, the app would get access to every user’s calendar in the Office 365 organization. We want to minimize the access our app has. Principle of least privilege is important.
It is however recommended to use application permissions if it is critical that you always have access. Delegated permissions come with their set of downsides too, and one of them is that access can to an API can be lost for various reasons. If your app can’t handle that, you have to use app permissions. Period. In this case if we lose access, ContractZen can notify the user of the problem, and once the user re-authenticates and gives us access again we can run a full sync, which will bring the user’s calendar up to date again.
If you use the Azure AD v2 endpoint, you can use incremental consent instead of a second registered app to require access to the calendar later on. It allows you to require only minimal access at the beginning, but require additional access later. Version 1, which we are using in ContractZen, does not support incremental consent.
Creating the app
We created a new multi-tenant application in Azure AD, and had it require the Have full access to user calendars delegated permission.
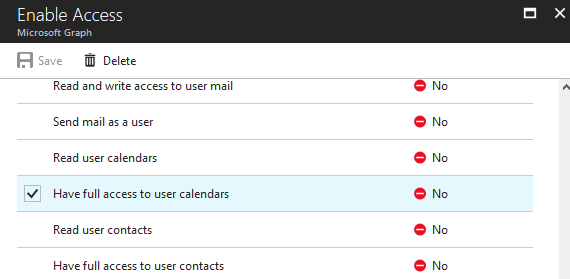
Note that it says No on the right-hand column. This means the permission can be given by regular users, and does not need administrator consent.
We also had to specify the reply URLs so they matched our application in each environment. You also need to add a key, so that your application can get access tokens.
Adding the feature
To implement the feature, we added a button with instructions to the user settings page. Clicking this button triggers the authentication redirect. Here is how the redirect URL might look like:
We of course use https://login.microsoftonline.com/common as the authentication authority.
This way users can sign in with any organization’s account.
Short explanations on the parameters:
- client_id: Id of our calendar integration app in Azure AD
- response_type: Specifies we want an authorization code and Id token back
- response_mode: We want the response to be done as an HTTP POST (instead of a GET)
- prompt: Require user to consent to the permissions
- msafed: Disables support for Microsoft accounts added to Azure AD
- redirect_uri: Where the response is sent after user logs in
- nonce: Something that makes this request unique, and allows us to make sure the response we get is a result of this request. Should be unique for every request.
The nonce is also added to a cookie on the user.
Once the user comes back, the first thing that should be done is validate the Id token.
To do that, we will need the public signing keys Azure AD uses.
To find the signing keys, your app can get them at startup by first
requesting the manifest at https://login.microsoftonline.com/common/.well-known/openid-configuration,
finding the jwks_uri from the response, and requesting the document containing the keys from the given address.
Currently the URL is https://login.microsoftonline.com/common/discovery/keys.
The tokens acquired from Azure AD are signed with one of those keys, and the token header says which one.
In .NET, you can use System.IdentityModel.Tokens.Jwt and Microsoft.IdentityModel.Protocols.OpenIdConnect in combination to get the signing keys and validate the token. This article goes into more detail: Manually validating a JWT using .NET.
From the Id token we can then get the nonce value, and compare it to the nonce value in the cookie the user has. If these do not match, we should reject the request. The existing cookie should also be deleted, so that it won’t accidentally get used again.
Now that we have a valid response, we can get an access token and a refresh token by exchanging the authorization code for them. You can see how the authorization code/hybrid flow works in the documentation. The access token that we get back is not important here. We only really need the refresh token, so our background job can get new access tokens for every user when it needs them. We will need to store the refresh token somewhere secure. Azure Key Vault for example can be a good option for this.
We will also need to get some info from the Id token.
In order to add calendar events for the user, we will need their tenant id
and object id.
These values will never change, so we do not need to worry about that.
You should not use the user principal name in this case, as it can be changed.
The tenant id is in a claim of type tid, though in a .NET ClaimsPrincipal it has the type http://schemas.microsoft.com/identity/claims/tenantid.
The object id for the user can be found from the oid / http://schemas.microsoft.com/identity/claims/objectidentifier claim.
Now once all of this is done, we are ready to start creating calendar events for the users.
Updating calendars in the background
Now when our background job periodically runs, it can get all the users who have enabled the feature from the database. Its workflow is quite simple:
- Get refresh token from secure storage for user
- Acquire access token
- Update calendar
- Repeat steps 1-3 for the rest of the users
However, we can run into some issues. A refresh token can be revoked for various reasons. One of them is the user resetting their password. This is the reason you need app permissions if the functionality is critical.
So we must prepare for this eventuality. If this should occur, we need to do at least the following:
- Flip a flag on the user that their token has been revoked
- So the job doesn’t retry until it is fixed
- Notify the user of the problem, and tell them how to fix it
- This can be an email for example
Fixing the situation is quite simple on a basic level. Just have the user do what they did originally to enable the feature. You’ll get a fresh refresh token, and all can work again.
Now the only issue is how to recover what they lost while the token was revoked. It helps a lot if the background job is idempotent, i.e. its result is the same no matter how many times it is run. In that case we could run it immediately, or let the situation fix itself automatically on the next run.
Another important thing to handle is refresh token expiration. Refresh tokens expire if they are not used; by default after 90 days. You can see what the default lifetimes are from the documentation.
But every time we run the background job and acquire an access token, we get a new refresh token. When we get it, we can overwrite the old one with it. If the background worker is running periodically, this should not be a problem. However, if there is a chance a refresh token is not used for 3 months, a scheduled job which refreshes refresh tokens can be a good idea.
Summary
By using a separate app registration we achieve the requirement of the feature being opt-in. Delegated permissions allow us to operate on minimal access rights. A lot can go wrong with things like this, and we hope this article helps your future endeavours.
In the v2 endpoint, we could actually use its ability to do incremental consent to get calendar access as well just by using one app. Otherwise our approach would be similar.