This is a guide for how to get started using Azure AD authentication in an ASP.NET Core application.
Requirements
- An Azure Subscription (You can get a free trial from here)
- An Azure Active Directory + a user in the directory
- The tools I mentioned in my other article here
Creating the application in Visual Studio
Create a new ASP.NET Core project in Visual Studio 2015, and choose the empty template.
Enabling HTTPS in the app
Since we are getting security tokens from Azure AD, TLS is very much mandatory.
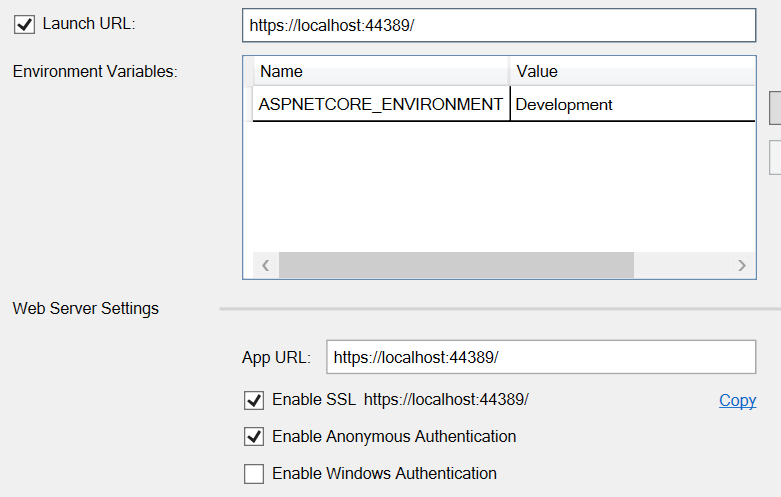
To enable it, right-click on the project in Visual Studio, and choose Properties.
Go to the Debug tab, and tick the checkbox that says Enable SSL.
Then copy the new https URL and set the launch URL and the App URL to it.
Adding the application to the directory
Open the old Azure Portal, and find your Azure AD.
Go to its Applications tab. Click the Add button in the bottom.
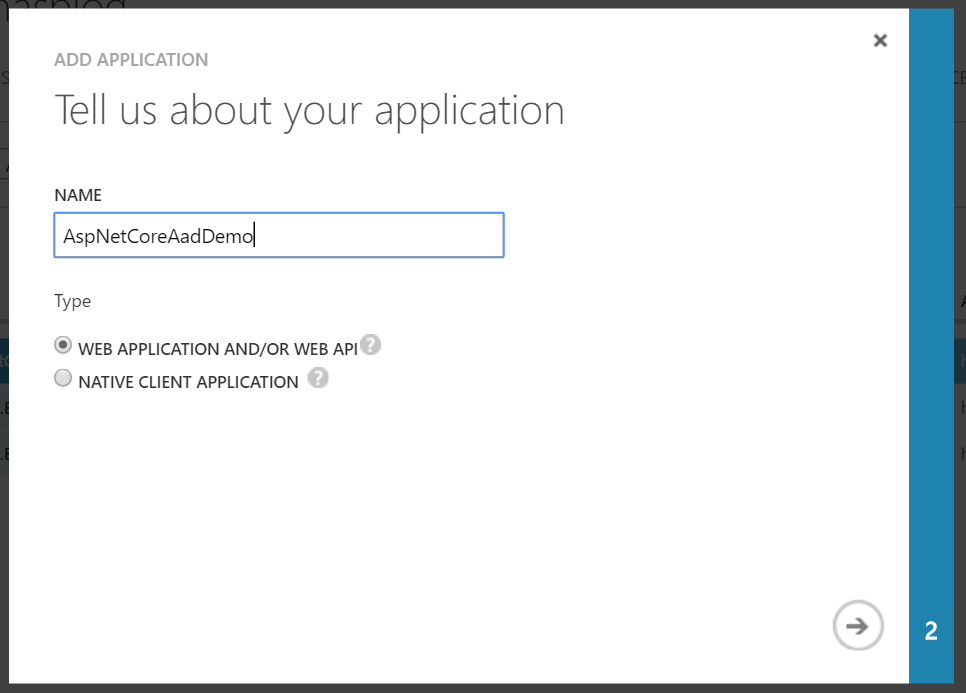
In the dialog, give a name for the application. Since this is the app that will be used in the development environment, I named it AspNetCoreAadDemo Dev.
Select Web Application/Web API as the type.
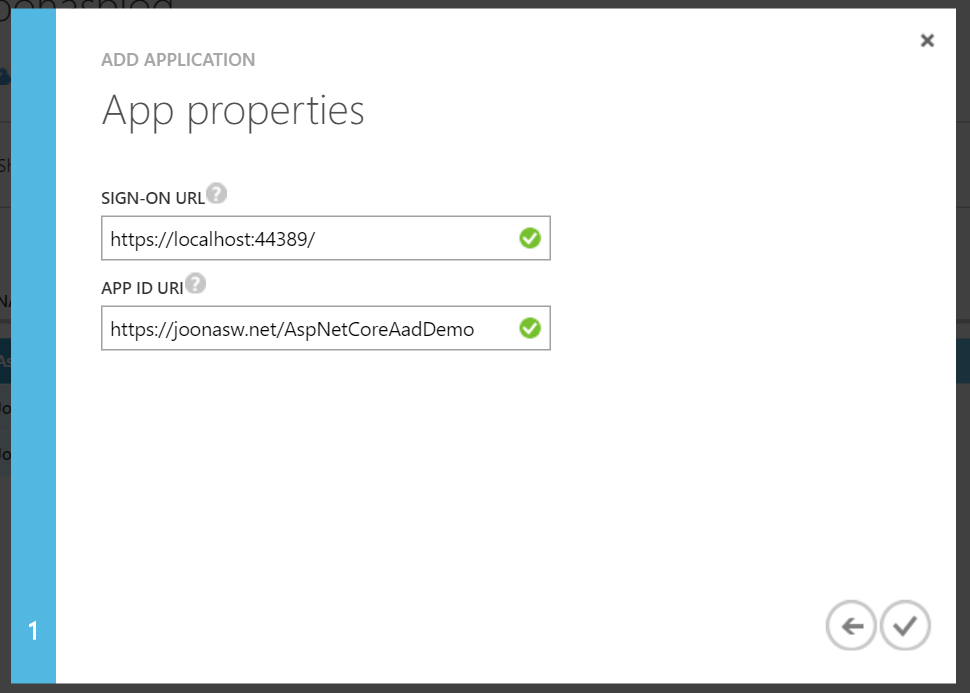
Set Sign-on URI to the HTTPS URL that you got in Visual Studio earlier, and add /account/signin to the end. For example: https://locahost:44389/account/signin.
Set the application URI to something like https://directoryname.onmicrosoft.com/AspNetCoreAadDemoDev. Replace directoryname with the name of your directory.
After the application is created, we will need to go to the Configure tab and grab the application's client id. Copy it somewhere, we will need it in a moment.
We will also need the directory's tenant id. You can find this quite easily by just clicking the View endpoints button at the bottom.
In the dialog, you can get the tenant id from any of the URLs.
It can look something like this: https://login.microsoftonline.com/00000000-0000-0000-0000-000000000000/oauth2/authorize. The guid in the URL is your tenant id.
Also, you have to add a reply URL such as https://localhost:44389/signin-aad. Replace the port with the port Visual Studio assigned.

Do not forget to save your changes :)
Adding dependencies
Now back to Visual Studio, we need some libraries to get everything to work.
Open up project.json, and make sure it looks like this:
{
  "dependencies": {
    "Microsoft.NETCore.App": {
      "version": "1.0.0",
      "type": "platform"
    },
    "Microsoft.AspNetCore.Diagnostics": "1.0.0",
    "Microsoft.AspNetCore.Server.IISIntegration": "1.0.0",
    "Microsoft.AspNetCore.Server.Kestrel": "1.0.0",
    "Microsoft.Extensions.Logging.Console": "1.0.0",

    "Microsoft.AspNetCore.Authentication.Cookies": "1.0.0",
    "Microsoft.AspNetCore.Authentication.OpenIdConnect": "1.0.0",
    "Microsoft.AspNetCore.Mvc": "1.0.0",
    "Microsoft.AspNetCore.Razor.Tools": {
      "version": "1.0.0-preview2-final",
      "type": "build"
    },
    "Microsoft.AspNetCore.StaticFiles": "1.0.0",
    "Microsoft.Extensions.Configuration.EnvironmentVariables": "1.0.0",
    "Microsoft.Extensions.Options.ConfigurationExtensions": "1.0.0",
    "Microsoft.Extensions.Configuration.Json": "1.0.0"
  },

  "tools": {
    "Microsoft.AspNetCore.Server.IISIntegration.Tools": "1.0.0-preview2-final",

    "Microsoft.AspNetCore.Razor.Tools": "1.0.0-preview2-final"
  },

  "frameworks": {
    "netcoreapp1.0": {
      "imports": [
        "dotnet5.6",
        "portable-net45+win8"
      ]
    }
  },

  "buildOptions": {
    "emitEntryPoint": true,
    "preserveCompilationContext": true
  },

  "runtimeOptions": {
    "configProperties": {
      "System.GC.Server": true
    }
  },

  "publishOptions": {
    "include": [
      "wwwroot",
      "web.config",

      "Views",
      "appsettings.json"
    ]
  },

  "scripts": {
    "postpublish": [ "dotnet publish-iis --publish-folder %publish:OutputPath% --framework %publish:FullTargetFramework%" ]
  }
}
Adding configuration
Add a new file to the project, call it appsettings.json.
The contents should be like this:
{
  "AzureAd": {
    "ClientId": "<your app client id>",
    "AadInstance": "https://login.microsoftonline.com/{0}",
    "TenantId": "<your directory tenant id>",
    "AuthCallback": "/signin-aad"
  }
}
You will need to replace the client and tenant ids with values that you got earlier.
Open Startup.cs, and add the following inside the Startup class:
public Startup(IHostingEnvironment env)
{
    var builder = new ConfigurationBuilder()
                    .SetBasePath(env.ContentRootPath)
                    .AddJsonFile("appsettings.json", optional: false, reloadOnChange: true)
                    .AddEnvironmentVariables();
    Configuration = builder.Build();
}

private IConfigurationRoot Configuration { get; }
This adds the appsettings.json file as a configuration source, so we can use the values we added.
Configuring Startup.cs
Add the following in ConfigureServices in Startup.cs:
services.AddMvc();
services.AddAuthentication(
    opts => opts.SignInScheme = CookieAuthenticationDefaults.AuthenticationScheme);
Then add the following in Configure:
loggerFactory.AddConsole();

if (env.IsDevelopment())
{
    app.UseDeveloperExceptionPage();
}

app.UseStaticFiles();

app.UseCookieAuthentication();

app.UseOpenIdConnectAuthentication(new OpenIdConnectOptions
{
    ClientId = Configuration["AzureAd:ClientId"],
    Authority = string.Format(Configuration["AzureAd:AadInstance"], Configuration["AzureAd:TenantId"]),
    CallbackPath = Configuration["AzureAd:AuthCallback"]
});

app.UseMvc(routes =>
{
    routes.MapRoute(
        name: "Default",
        template: "{controller=Home}/{action=Index}/{id?}");
});
What we are actually doing there is enabling cookie authentication, as well as Open Id Connect authentication.
We also set the default signin scheme to the cookie middleware. This means that when the Open Id Connect middleware receives a valid token, it'll cause signin to occur by the cookie middleware. Which creates a cookie storing the info about the user and sets it to the response.
Creating the controllers
First, create a folder called Controllers to store the controlles.
Then create HomeController.cs in the folder. It should look something like this:
using Microsoft.AspNetCore.Authorization;
using Microsoft.AspNetCore.Mvc;

namespace AspNetCoreAadDemo.Controllers
{
    public class HomeController : Controller
    {
        public IActionResult Index()
        {
            return View();
        }

        [Authorize]
        public IActionResult Authenticated()
        {
            return View();
        }
    }
}
So we have one action which is the index page. It does not require authentication.
The other action however, requires authentication. This is due to the Authorize attribute placed on it. Just by placing it there, we require authentication for access. (Note that typically you would place this attribute on class-level in the controller/as a global filter, and then make exceptions with [AllowAnonymous]
Then add AccountController.cs to the Controllers folder.
It should look like this:
using Microsoft.AspNetCore.Authentication.Cookies;
using Microsoft.AspNetCore.Authentication.OpenIdConnect;
using Microsoft.AspNetCore.Http.Authentication;
using Microsoft.AspNetCore.Mvc;

namespace AspNetCoreAadDemo.Controllers
{
    public class AccountController : Controller
    {
        public IActionResult SignIn()
        {
            return Challenge(
                new AuthenticationProperties
                {
                    RedirectUri = "/"
                },
                OpenIdConnectDefaults.AuthenticationScheme);
        }

        public IActionResult SignOut()
        {
            //Get absolute URL
            string returnUrl = Url.Action(
                action: nameof(SignedOut),
                controller: "Account",
                values: null,
                protocol: Request.Scheme);
            return SignOut(
                new AuthenticationProperties
                {
                    RedirectUri = returnUrl
                },
                CookieAuthenticationDefaults.AuthenticationScheme,
                OpenIdConnectDefaults.AuthenticationScheme);
        }

        public IActionResult SignedOut()
        {
            if (User.Identity.IsAuthenticated)
            {
                return RedirectToAction(
                    actionName: "Index",
                    controllerName: "Home");
            }
            return View();
        }
    }
}
This provides actions to sign in and sign out users. You should be happy to know that the Open Id Connect middleware will redirect users to Azure AD also in the case when authorization fails. The SignIn action here simply provides a way to explicitly sign in.
Creating the views
To get started creating the views, create a folder called Views.
First, in the Views folder, create two files: _ViewImports.cshtml, and _ViewStart.cshtml.
The _ViewImports.cshtml file should contain just one line:
@addTagHelper *, Microsoft.AspNetCore.Mvc.TagHelpers
This adds a few tag helpers that we will use later.
The _ViewStart.cshtml file is also quite simple:
@{
    Layout = "_Layout";
}
This sets the default layout page for all other pages to be _Layout.cshtml.
So let's create that. Create a Shared folder within the Views folder.
Then create the _Layout.cshtml file, here is how it looks like for me:
<!DOCTYPE html>
<html>
<head>
<meta name="viewport" content="width=device-width" />
<title>Azure AD Demo</title>
<link rel="stylesheet" href="https://ajax.aspnetcdn.com/ajax/bootstrap/3.3.6/css/bootstrap.min.css"/>
<link href="~/css/styles.css" rel="stylesheet" />
</head>
<body>
<div class="navbar navbar-inverse navbar-fixed-top">
<div class="container">
<div class="navbar-header">
<button type="button" class="navbar-toggle" data-toggle="collapse" data-target=".navbar-collapse">
<span class="sr-only">Toggle navigation</span>
<span class="icon-bar"></span>
<span class="icon-bar"></span>
<span class="icon-bar"></span>
</button>
<a asp-controller="Home" asp-action="Index" class="navbar-brand">Azure AD Demo</a>
</div>
<div class="navbar-collapse collapse">
<ul class="nav navbar-nav">
<li>
<a asp-controller="Home" asp-action="Index">Home</a>
</li>
<li>
<a asp-controller="Home" asp-action="Authenticated">Authenticated area</a>
</li>
</ul>
@await Html.PartialAsync("_LoginPartial")
</div>
</div>
</div>
<div class="container body-content">
@RenderBody()
<hr />
<footer>
<p>© 2016 - Azure AD Demo</p>
</footer>
</div>
<script src="https://ajax.aspnetcdn.com/ajax/jquery/jquery-2.2.0.min.js"></script>
<script src="https://ajax.aspnetcdn.com/ajax/bootstrap/3.3.6/bootstrap.min.js"></script>
</body>
</html>
One thing to note there is the new way of creating action links:
<a asp-controller="Home" asp-action="Index">Home</a>
Pretty cool. Keeps the HTML very clean.
This layout references a partial called "_LoginPartial", so we'll need to create that too.
Add _LoginPartial.cshtml to the Shared folder.
<ul class="nav navbar-nav navbar-right">
    @if (User.Identity.IsAuthenticated)
    {
        <li class="navbar-text">
            @User.Identity.Name
        </li>
        <li>
            <a asp-action="SignOut" asp-controller="Account">Sign out</a>
        </li>
    }
    else
    {
        <li>
            <a asp-action="SignIn" asp-controller="Account">Sign in</a>
        </li>
    }
</ul>
This will show the user's name once they are logged in and allow users to sign in and sign out.
Create a Home folder in the Views folder.
In there create Index.cshtml.
<div class="jumbotron">
    <h1>Front page</h1>
</div>
So that's the front page done.
Then create Authenticated.cshtml in the same folder.
<div class="jumbotron">
    <h1>Hello @(User.Claims.First(c => c.Type == "name").Value)!</h1>
</div>
The interesting thing here is that it grabs the display name of the user from their claims. It's usually best to use it rather that User.Identity.Name, which is usually the login name.
Then add an Account folder in the Views folder.
Add SignedOut.cshtml to that folder.
<h1>You have signed out</h1>
This is what users will see after they have signed out.
Now there is only one more thing needed. A small bit of CSS to fix the top margin.
Create a css folder within the wwwroot folder. Then add styles.css there.
body {
    margin-top: 60px;
}
Our views are now ready!
Testing locally
Hit F5 to run the app locally. You should be greeted by the front page. Now try going into the authenticated area. You should hit Azure AD and be required to authenticate. Sign in with a user in the same directory as the application.
You should be forwarded back to the app and see your login name in the top right. Also, you should see your display name in the middle.

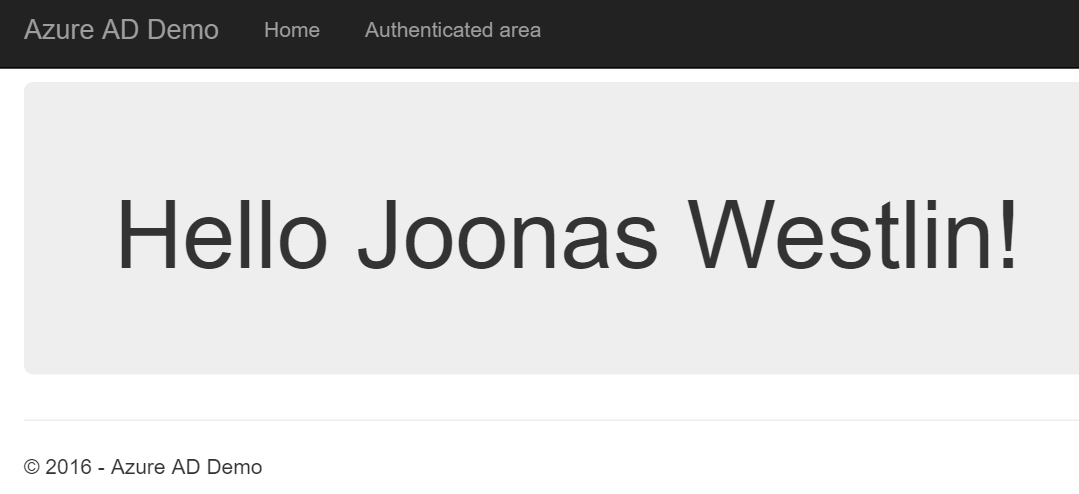
You can also test that signing out works.
Publishing to Azure
Right-click on the project and click Publish. Here choose Microsoft Azure App Service.
Sign in to the account associated with your Azure subscription, and choose New....
Set the Web App parameters to what you want and confirm its creation.
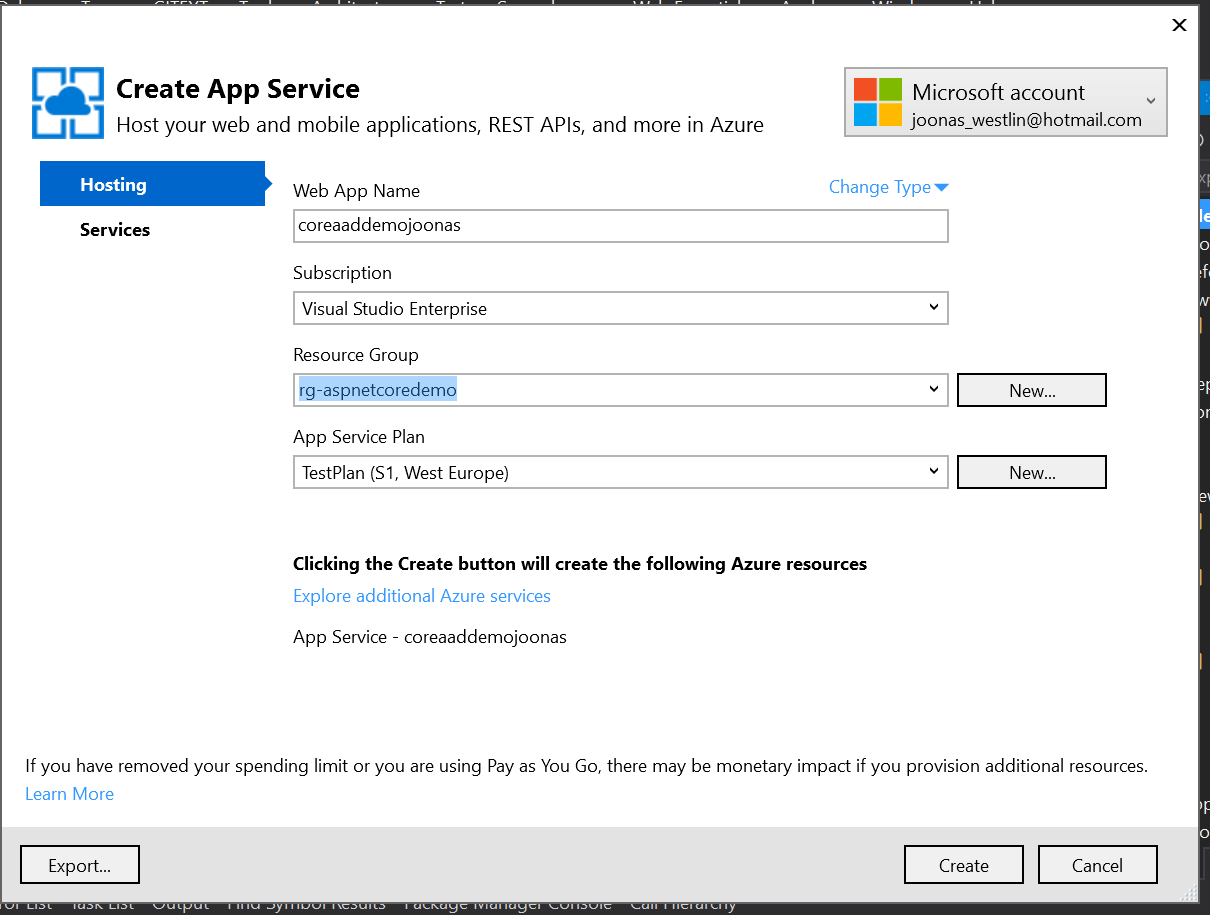
Just go through the pages of the Publish wizard, and hit Publish.
If you try to sign in to the app, you will see it won't work. The reason is that it still tries to sign in to the development application in Azure AD.
Adding the production app to Azure AD
Create a new application your directory, set its name as something like AspNetCoreAadDemo Prod.
The sign-on URL should be the URL of your Azure Web App + /account/signin. So for example: https://coreaaddemojoonas.azurewebsites.net/Account/SignIn
Then we have to add a different reply URL to this new app. It should be something like this: https://coreaaddemojoonas.azurewebsites.net/signin-aad.
Now there is one thing left to do. We have to make sure the app uses the right client id in Azure. So open up the new Azure Portal, and find your new Web App.
Go to its settings and add a new app setting with the key AzureAd:ClientId. Set the value to the client id of the new app you just created in the directory.

Everything should function now :)

If you still get an error about the reply URL, one reason can be that you are accessing the app over HTTP, not HTTPS.
Summary
Even though there is a lot of work here to setup everything, it is better to do it at least once manually so you understand what is happening behind the scenes when VS creates a project with AAD authentication.
Once you do have everything setup, controlling authorization is very easy. Now I did not cover roles here. Looking quickly at the API, it seems to be pretty much the same as how it was done in the OWIN middleware. You need to tell the middleware which claim contains the roles, and it'll handle the rest.
You should also enforce HTTPS and enable HSTS on the app to make sure your users do not hit the non-encrypted version of the app.
Also do not forget to check the official ASP.NET Core security documentation!