This article covers pretty much all the important things about localization in ASP.NET Core and MVC Core.
It’s quite long, but I tried to focus the important stuff here so you can use it as a reference.
This has been written from the point of view of ASP.NET Core 2.0. Mostly it applies to 1.X as well. If you have a problem with 1.X, leave a comment, and I’ll make sure to note that in the article.
Getting started
Let’s start with something really simple.
First off, you’ll need the Microsoft.AspNetCore.Localization NuGet package.
That is the minimum. You may need others for different things as well:
- Microsoft.AspNetCore.Localization.Routing: Localization with routes, e.g. mysite.com/en-us/Home/Index
- Microsoft.AspNetCore.Mvc.Localization: MVC Core Localization components, e.g. view localization, data annotation localization (Included in Microsoft.AspNetCore.Mvc)
These are all part of the Microsoft.AspNetCore.All meta-package so most 2.0 developers
will already have these in all projects by default.
The easiest way is to use VS 2017 and create a new ASP.NET Core MVC project.
Configuring Startup
First, we will simply change the ConfigureServices method in the Startup class
to this:
public void ConfigureServices(IServiceCollection services)
{
    services.AddLocalization(o =>
    {
        // We will put our translations in a folder called Resources
        o.ResourcesPath = "Resources";
    });
    services.AddMvc();
}
This adds the necessary services for localization to the service container.
It also specifies that we will use a folder called Resources to put our translation resources in.
If you do not specify a resources path, the resource files will be expected to be in the app’s root folder.
Then we need to add the request localization middleware to Configure in Startup:
public void Configure(IApplicationBuilder app, IHostingEnvironment env)
{
    app.UseStaticFiles();

    IList<CultureInfo> supportedCultures = new List<CultureInfo>
    {
        new CultureInfo("en-US"),
        new CultureInfo("fi-FI"),
    };
    app.UseRequestLocalization(new RequestLocalizationOptions
    {
        DefaultRequestCulture = new RequestCulture("en-US"),
        SupportedCultures = supportedCultures,
        SupportedUICultures = supportedCultures
    });

    app.UseMvc(routes =>
    {
        routes.MapRoute(
            name: "default",
            template: "{controller=Home}/{action=Index}/{id?}");
    });
}
We need the middleware so that the culture for the request is set correctly.
Note that it must be before any middleware that depends on the culture, such as MVC.
The three options we specify for the middleware are all important:
- DefaultRequestCulture: This is the fallback that is used if we can’t figure out which one should be used
- SupportedCultures & SupportedUICultures: The cultures we wish to support
A culture is used for number and date formats etc., while a UI culture is used for looking up translations from resource files. Here we set the supported lists to contain the same cultures.
A culture is usually defined as e.g. en-US
The format is {ISO 639-1 language code}-{ISO 3166-1 alpha-2 country code}
en-US is American English, en-GB is British English
They both share the same parent culture: en
ISO 3166-1 alpha-2 country codes
The middleware adds 3 providers for the request culture by default:
- QueryStringRequestCultureProvider: Gets the culture from query string values
- CookieRequestCultureProvider: Gets the culture from a cookie
- AcceptLanguageHeaderRequestCultureProvider: Gets the culture from the Accept-Language request header
We will look at these a bit later, but be aware most browsers send the Accept-Language header by default to all pages. Don’t be like me and get confused why the default request culture is not working…
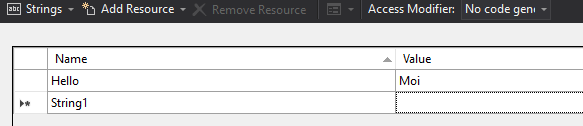
Adding the resource file
Now the last thing we need before we get to actually using the localization is a resource file.
All we need to do is:
- Create a folder called Resources in the project
- Add a Resources file called Controllers.HomeController.fi-FI.resx there
- Use another culture if you want :)
- Add a line in the resource file with the Name set to Hello and the Value to Moi
Now you may get some errors saying something about failing to generate files. This is a bug in VS and will hopefully be fixed later. You can ignore the error or open the .csproj file and erase all the ItemGroups about the resource files. We don’t need the code generator.
It should look something like this:
Localizing a string in the controller
We will modify the constructor of HomeController to give us an IStringLocalizer<T>
and an ILogger<T>. Then in the Index action, we will simply write a localized string
to the log:
private readonly IStringLocalizer<HomeController> _localizer;
private readonly ILogger<HomeController> _logger;

public HomeController(IStringLocalizer<HomeController> localizer,
    ILogger<HomeController> logger)
{
    _localizer = localizer;
    _logger = logger;
}

public IActionResult Index()
{
    _logger.LogInformation(_localizer["Hello"]);
    return View();
}
If you run the app now in Debug mode, you should see the following in the log:
info: CoreLocalization.Controllers.HomeController[0]
Hello
If you are from Finland and you are running a Finnish browser, you might see Moi.
Now try adding ?culture=fi-FI to the end of the URL in your browser, and see what happens.
info: CoreLocalization.Controllers.HomeController[0]
Moi
If all of that worked, congratulations!
Now you could add another resource file with another culture specified on the file name,
add it as a supported culture in Startup, and you can use that too.
Resource file naming
So why did we need to name the resource file Controllers.HomeController.fi-FI.resx?
The name format is composed of two parts:
- Fully-qualified class name minus the assembly name
- Culture
Since here the HomeController class’ fully-qualified name is
CoreLocalization.Controllers.HomeController, and the assembly is
CoreLocalization.dll, we use Controllers.HomeController.
Do note we could use the fully-qualified one if desired.
Instead of “dot-naming”, you can also use folders to organize the resource files.
In this case you would have a folder structure like this:
- Resources
- Controllers
- HomeController.fi-FI.resx
- Controllers
Use whichever you like.
The default culture providers
The localization middleware uses 3 providers by default to figure out the request’s culture.
They are evaluated in order:
- Query string
- Cookie
- Accept-Language header
Query string
You can define the culture to use with query strings like:
?culture=fi-FI&ui-culture=fi-FI

?culture=fi-FI

?ui-culture=fi-FI
All three set both culture and UI culture to Finnish. You can specify both to make them different.
Cookie
A more persistent localization method, it checks for a cookie with a specific name in the request.
The default name of the cookie can be gotten from
CookieRequestCultureProvider.DefaultCookieName.
It’s .AspNetCore.Culture by the way.
The cookie value should be similar to one of these 3:
c=fi-FI|uic=fi-FI

c=fi-FI

uic=fi-FI
Once again, all three set both culture and UI culture to Finnish.
You might want to change the name of the cookie. The main reason I can think of doing so would be to prevent it from messing up stuff running in the same domain. A development environment is a good example of that.
You can change the cookie name quite easily:
var localizationOptions = new RequestLocalizationOptions
{
    DefaultRequestCulture = new RequestCulture("en-US"),
    SupportedCultures = supportedCultures,
    SupportedUICultures = supportedCultures
};
// Find the cookie provider with LINQ
var cookieProvider = localizationOptions.RequestCultureProviders
    .OfType<CookieRequestCultureProvider>()
    .First();
// Set the new cookie name
cookieProvider.CookieName = "UserCulture";

app.UseRequestLocalization(localizationOptions);
Accept-Language header
This provider checks the Accept-Language request header sent by the browser.
Mine looks like this:
Accept-Language:en-US,en;q=0.8,fi;q=0.6
It requests for US English first, then any other English locale, and finally Finnish.
This provider’s awesomeness is that the user doesn’t have to select their locale at all. Though they might still want to change it, in which case setting a cookie or query string would override this.
A small thing you can customize on the provider is the amount of header values it will try. The default is currently 3. You would have to find the provider similarly as we did with cookie provider to change this.
RouteDataRequestCultureProvider
Want to make routes like www.mysite.com/en-us/Home/Index or www.mysite.com/fi-fi/Home/Index?
Then this additional provider is for you!
Now there are some problems with its setup, as it relies on the route values provided by the router. Since the localization middleware runs before the MVC router, we will have to do some additional setup.
Here is an example of configuring the middleware pipeline:
IList<CultureInfo> supportedCultures = new List<CultureInfo>
{
    new CultureInfo("en-US"),
    new CultureInfo("fi-FI"),
};
var localizationOptions = new RequestLocalizationOptions
{
    DefaultRequestCulture = new RequestCulture("en-US"),
    SupportedCultures = supportedCultures,
    SupportedUICultures = supportedCultures
};
var requestProvider = new RouteDataRequestCultureProvider();
localizationOptions.RequestCultureProviders.Insert(0, requestProvider);

app.UseRouter(routes =>
{
    routes.MapMiddlewareRoute("{culture=en-US}/{*mvcRoute}", subApp =>
    {
        subApp.UseRequestLocalization(localizationOptions);

        subApp.UseMvc(mvcRoutes =>
        {
            mvcRoutes.MapRoute(
                name: "default",
                template: "{culture=en-US}/{controller=Home}/{action=Index}/{id?}");
        });
    });
});
Here we use a router to grab the culture from the URL and set up the route data before hitting the localization middleware. The defined route uses a catch-all parameter to route all requests there.
Note that we also insert the provider at index 0, so it will be checked first always. You can also make it last, or just make the list of providers whatever you want.
Andrew Lock has a great article on setting up this option as an MVC filter as well. You can check it out to see another way in which this can be done: https://andrewlock.net/url-culture-provider-using-middleware-as-mvc-filter-in-asp-net-core-1-1-0/.
IStringLocalizer
So what does that object we injected to HomeController allow
us to do?
private readonly IStringLocalizer<HomeController> _localizer;

public HomeController(IStringLocalizer<HomeController> localizer)
{
    _localizer = localizer;
}
The obvious thing is that the type specified is used to look up the resource file.
Now you might want to share some of the resource files, in which case you can of course specify another type as the type parameter there.
A pattern shown in the official docs is to create a dummy class like:
public class SharedResources
{
}
And then just inject IStringLocalizer<SharedResources> whereever it is needed.
And create files like SharedResources.fi-FI.resx of course.
When we get translations, we use the indexer that accepts a string:
string localizedString = _localizer["Hello to you!"];
It then follows these steps to return a value:
- Find the resource file for the current culture.
- If it has a row with Name
Hello to you!, the value is returned.
- If it has a row with Name
- Find the resource file for the parent culture (e.g. en-US parent culture is en)
- If value found, return.
- Return the parameter for the indexer.
So as you can see, you will always get Hello to you! as a fallback if nothing else is available.
An interesting thing to note is that the indexer does not actually
return a string.
It returns a LocalizedString, which has an implicit conversion
to string.
You can accept a LocalizedString instead if you want to know
whether the resource was found for example, and where did it try to search.
Formatted strings
We can use another overload of the indexer to take advantage of format strings:
string firstName = "John";
string lastName = "Doe";
string localizedString = _localizer["Hello {0} {1}!", firstName, lastName];
//Finnish RESX file contains: "Hello {0} {1}!" => "Moi {0} {1}!"
We get Hello John Doe! in English locale, and Moi John Doe! in Finnish locale.
Internally the localizer finds the string and runs string.Format
on it.
Other features
You can get a localizer for a specific culture from another localizer with:
IStringLocalizer finnishLocalizer = _localizer.WithCulture(new CultureInfo("fi-FI"));
The new localizer will be for the same type as the original.
Interestingly if you call
WithCulture(null), it just gives you a new instance with the same culture. Don’t know why that is a thing.
There is also a function to get all strings for the localizer’s culture:
IEnumerable<LocalizedString> localizedStrings = _localizer.GetAllStrings(includeParentCultures: true);
The includeParentCultures parameter defines if it will return strings from the *.en.resx file
as well as the *.en-US.resx file for instance.
There is an extension method as well that’s the same thing as the indexer:
string localizedString = _localizer.GetString("Hello");
//Same as
string localizedString = _localizer["Hello"];
IHtmlLocalizer
This class exists purely for one reason. The LocalizedHtmlString objects
it returns HTML-encode the value when written to output.
However the resource key/name is not!
An example controller:
private readonly IStringLocalizer<HomeController> _localizer;
private readonly IHtmlLocalizer<HomeController> _htmlLocalizer;

public HomeController(IStringLocalizer<HomeController> localizer,
    IHtmlLocalizer<HomeController> htmlLocalizer)
{
    _localizer = localizer;
    _htmlLocalizer = htmlLocalizer;
}

public IActionResult Index()
{
    ViewBag.HelloHtml = _htmlLocalizer["<h1>Hello {0}</h1>", "<b>John</b>"];

    ViewBag.HelloNormal = _localizer["<h1>Hello {0}</h1>", "<b>John</b>"];

    return View();
}
And the corresponding view:
<p>
    @ViewBag.HelloHtml
</p>
<p>
    @ViewBag.HelloNormal
</p>
Results in this:
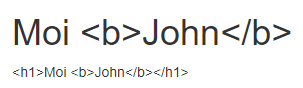
Notice how the normal localizer’s string gets completely encoded, but only the HTML localizer’s arguments got encoded?
You can use IHtmlLocalizer if you want your resource name/key to contain
HTML that does not get encoded when outputed.
I would not recommend putting HTML in resources though.
Stick with just text if possible.
Localized views (separate views for different cultures)
If you want, you can have separate Razor files for different cultures.
This one is quite easy to setup. Just add the following in ConfigureServices:
public void ConfigureServices(IServiceCollection services)
{
    services
        .AddMvc()
        .AddViewLocalization(LanguageViewLocationExpanderFormat.Suffix);
}
And create a view for a different culture, such as About.fi-FI.cshtml or About.fi.cshtml. Place the file right next to the default About.cshtml file.
Now assuming you have request localization middleware setup, you should now get a different view for a different culture.
You may have noticed in the example that we specified
LanguageViewLocationExpanderFormat.Suffix, which means the culture
name is part of the view file name. This is also the default if
you don’t specify the parameter.
The other option is SubFolder, which requires that you make the view folder
structure like this:
- Views
- Home
- fi-FI
- About.cshtml
- About.cshtml
- fi-FI
- Home
So you make folders for the individual cultures. This one might be preferred if you have a lot of views for a controller or support many cultures.
ViewLocalizer
ViewLocalizer is a class that can be used in Razor views to get access to
translations for the specific view. Remember that Razor generates a class but you
can’t reference the class name. ViewLocalizer exists because of this reason.
It inherits from HtmlLocalizer, so the API is the same.
It also means it will not HTML-encode the resource name/key.
Injecting it can be done in the _ViewImports.cshtml file:
@using Microsoft.AspNetCore.Mvc.Localization

@inject IViewLocalizer Localizer
Now we can use the Localizer property in any view like:
<p>@Localizer["Hello"]</p>
Now if this was done in the Contact.cshtml view in the Home folder, the expected name of the resource file will be Views.Home.Contact.fi-FI.resx.
Or if using folders:
- Resources
- Views
- Home
- Contact.fi-FI.resx
- Home
- Views
If used in the _Layout.cshtml view, the name should be Views.Shared._Layout.fi-FI.resx.
Note that you can also inject an IHtmlLocalizer<SharedResources> for example
to access any shared resources you want.
Data annotation localization
Do you know what the attributes on these properties are?
[Required]
public string Name { get; set; }

[Range(1, 99)]
public int Age { get; set; }
If you did not, they are called data annotations.
They allow us to specify constraints on the data declaratively.
In this case that the Name property is required, and that the
Age property must be a number between 1 and 99.
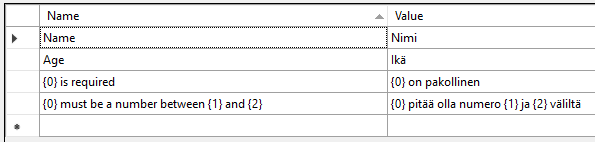
Now we can add error messages to replace the default ones like:
namespace CoreLocalization.Models
{
    public class PersonViewModel
    {
        [Display(Name = "Name")]
        [Required(ErrorMessage = "{0} is required")]
        public string Name { get; set; }

        [Display(Name = "Age")]
        [Range(1, 99, ErrorMessage = "{0} must be a number between {1} and {2}")]
        public int Age { get; set; }
    }
}
Note that data annotations often allow you to use their arguments in the error
messages. Here the RangeAttribute allows us to get the minimum via index 1,
and the maximum via index 2. (Index 0 is the property name in both)
Now to translate we will need to create a resource file with the name Models.PersonViewModel.fi-FI.resx to support the Finnish locale.
The last, critical missing piece of the puzzle is to call AddDataAnnotationsLocalization
in ConfigureServices:
public void ConfigureServices(IServiceCollection services)
{
    services
        .AddMvc()
        .AddDataAnnotationsLocalization();
    services.AddLocalization(o =>
    {
        o.ResourcesPath = "Resources";
    });
}
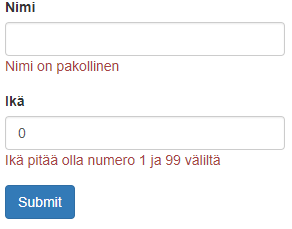
Now you can get localized labels and error messages:
I would like to put common error messages like X is required in some shared resource file if possible, but couldn’t figure out a way to do that. You can specify a resource type, but at the moment we are not generating the classes.
There is a way to change the default messages: https://blogs.msdn.microsoft.com/mvpawardprogram/2017/05/09/aspnetcore-mvc-error-message/, but it only sets the messages to English.
Summary
Localization in ASP.NET Core and MVC Core is not all that complicated. Take your time to understand how all of it works and you will be making localized apps in no time!
Here are some links to related content: