On my continuing quest to rid our apps of all stored credentials, the next thing on the list is Azure Service Bus connection strings. In case you missed it, Azure Service Bus now supports Azure AD authentication! Which means we can use Managed Identities for Azure resources to access them!
Keep in mind this feature is still in preview, and thus can be subject to changes as well as some instability.
I have already created the Web App on Azure where the app using Service Bus will run, as well as the Service Bus namespace and a queue in it.
You can find the sample code (along with samples for accessing other Azure services) in the GitHub repo. You can also see the sample running live at https://joonasmsitests.azurewebsites.net. There’s a page that has a button for sending messages and another page that shows received messages over SignalR.
You can skip the first section if you are already familiar with how Managed Identities are enabled.
Enabling system-assigned identity on App Service
In this case we’ll be hosting the app on an Azure Web App, which is part of App Service. And there we will enable a system-assigned managed identity. If you want to know more about these and the other type available, check out my previous article.
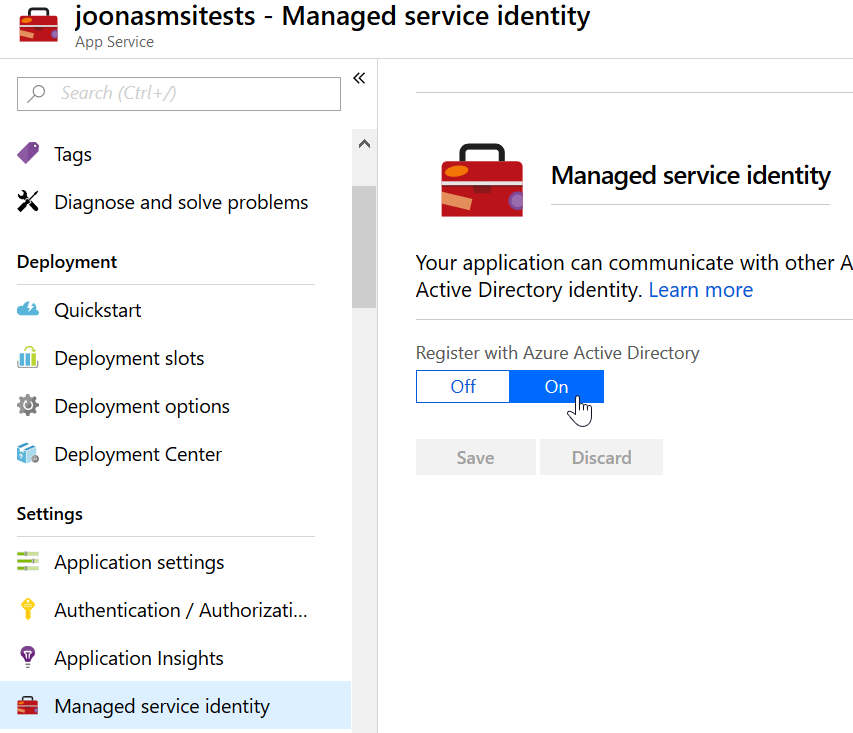
To enable the identity, all we need to do is:
- Open the Web App in Azure Portal
- Go to Managed service identity under Settings
- Set the switch to On and click Save
Now a service principal will be generated in the Azure AD connected to the subscription. This is the identity for our App Service that is fully managed by Azure. So next let’s give it the access it needs.
Adding the needed role
To give the generated service principal access, you’ll need to open the Service Bus namespace in the Azure Portal. Then you navigate to the Access Control (IAM) tab. Now add either the Contributor or Owner role to the service principal.
I recommend Contributor which has less access.
Now I have a few things I want to say about the granularity of this, but I’ll save it to the end of the article.
A similar role is needed for your user account if you wish to use the same code from a local dev environment.
Sending a queue message
To interact with Azure Service Bus, we’ll use the official Microsoft.Azure.ServiceBus library. In the sample app, it has been added into the .csproj as:
<PackageReference Include="Microsoft.Azure.ServiceBus" Version="3.1.1" />
Next, we can implement the message sending part. To send the message we must:
- Create a token provider (built-in/custom)
- Create the queue client targeting the right SB namespace and queue, along with the token provider
- Send the message using the client
Sounds simple right? Well, honestly it is.
In the sample this function performs the needed steps:
public async Task SendServiceBusQueueMessage()
{
    string endpoint = _settings.ServiceBusNamespace + ".servicebus.windows.net";
    string queueName = _settings.ServiceBusQueueName;
    // We could use ManagedServiceIdentityTokenProvider here
    // But it failed for me with an assembly not found error relating to the AppServices Authentication library
    var tokenProvider = new ManagedIdentityServiceBusTokenProvider(_settings.ManagedIdentityTenantId);
    var queueClient = new QueueClient(endpoint, queueName, tokenProvider);

    var message = new Message(
        Encoding.UTF8.GetBytes($"Test message {Guid.NewGuid()} ({DateTime.UtcNow:HH:mm:ss})"));
    await queueClient.SendAsync(message);
}
We take a few things from configuration here. These are the Service Bus namespace name, the queue name, and the Azure AD tenant id to use (optional). The first two locate the queue we want to use, and the last one is used optionally for local development.
You can see the code is pretty straightforward.
We create a token provider and a queue client, and send a message.
There is one very important thing to note though,
we are using a custom ManagedIdentityServiceBusTokenProvider class.
There is a built-in ManagedServiceIdentityTokenProvider in the SDK,
however it did not work for me.
It also does not allow specifying the Azure AD tenant id,
which is important in local dev.
When running in Azure, you don’t need to specify the tenant since the service principal only exists in one tenant. But when running locally, your user can be a member of multiple tenants. And if you do not specify one, it’ll use the home tenant for that user. Which may or may not be correct. So it can be a good idea to specify it for local dev.
You can see the custom token provider here:
using System;
using System.Threading.Tasks;
using Microsoft.Azure.Services.AppAuthentication;
using Microsoft.Azure.ServiceBus.Primitives;

namespace Joonasw.ManagedIdentityDemos.Services
{
    public class ManagedIdentityServiceBusTokenProvider : TokenProvider
    {
        private readonly string _managedIdentityTenantId;

        public ManagedIdentityServiceBusTokenProvider(string managedIdentityTenantId = null)
        {
            if (string.IsNullOrEmpty(managedIdentityTenantId))
            {
                // Ensure tenant id is null if none given
                _managedIdentityTenantId = null;
            }
            else
            {
                _managedIdentityTenantId = managedIdentityTenantId;
            }
        }

        public override async Task<SecurityToken> GetTokenAsync(string appliesTo, TimeSpan timeout)
        {
            string accessToken = await GetAccessToken("https://servicebus.azure.net/");
            return new JsonSecurityToken(accessToken, appliesTo);
        }

        private async Task<string> GetAccessToken(string resource)
        {
            var authProvider = new AzureServiceTokenProvider();
            return await authProvider.GetAccessTokenAsync(resource, _managedIdentityTenantId);
        }
    }
}
This was very straightforward to implement,
just make sure you use https://servicebus.azure.net/ as the resource identifier.
And that’s it! You can check out the live sample app to see it sending and receiving queue messages. The source code for the app is on GitHub.
Local development
To use the same code in local development, you may need to do a bit more setup. In both of the options I give here, a user account is used. This user must have the same Contributor/Owner role on the Service Bus namespace.
Visual Studio users can select their user account from Tools -> Options -> Azure Service Authentication. With this option you may need to specify the Azure AD tenant id to use in code. I had a problem since I was using a Guest account for authentication, and so I needed to use a different AAD tenant from the user’s home tenant.
Another option is to use the az CLI.
With it you need to login with your user account and ensure you login to the right Azure AD tenant.
AzureServiceTokenProvider runs a command on the az CLI to get an access token as one of the options it supports.
This option should work with all OSs.
Thoughts on granularity
If you’ve seen my previous article on Storage and Managed Identities, you may remember I liked the granular roles they made (e.g. Blob Data Reader). With Service Bus, you can only give namespace-wide access to the service.
This kind of sucks since the granularity is worse than what you could have with shared access policies (which can give specific access at namespace- or queue-level). What Service Bus needs is the granularity to allow a service to read queue messages from a single queue. Hopefully that is something that we get in the future.
Until this improves, the usefulness of Azure AD authentication support on Service Bus is limited. If you use it, keep in mind the service will have the rights to perform any management operations it wants on the Service Bus namespace.
The advantage of having no credentials in code or configuration is of course massive, and in my opinion outweighs the disadvantages of the lack of granularity.
Limitations
At the moment, there is at least one limitation:
Management operations that change the namespace topology are initially only supported though Azure resource management and not through the native Service Bus REST management interface. This support also means that the .NET Framework client NamespaceManager object cannot be used with an Azure AD account.
What it means is that you cannot, for example, create queues using NamespaceManager from the SDK.
But since your service principal has Contributor access at minimum,
you can create queues via the Azure Resource Management API.
Summary
I really like the direction where Managed Identities and Azure AD authentication are headed. Over the next year, we are sure to see more services enable these capabilities. And through that move closer to the possibilty of having exactly 0 credentials stored anywhere in the app. Zero credentials that you have to manage. Zero credentials that you have to protect.
It is my wish that Service Bus improves the granularity of Azure AD authentication as it is too coarse right now. But it already enables developers to remove the service bus connection strings in their apps. And I encourage you to give it a try :)
Thanks for reading!
Links
- Official docs: https://docs.microsoft.com/en-us/azure/service-bus-messaging/service-bus-role-based-access-control
- Sample app repository: https://github.com/juunas11/Joonasw.ManagedIdentityDemos
- Queue listener in the sample app: https://github.com/juunas11/Joonasw.ManagedIdentityDemos/blob/master/Joonasw.ManagedIdentityDemos/Background/QueueListenerService.cs