In case you are not already familiar with them, Azure AD B2C allows the usage of custom policies to build customized authentication flows. When there are requirements that the built-in user flows cannot fulfil, custom policies can be used. They are defined using XML files, which can be quite verbose. But they do allow a great deal of power while still allowing you to use the global scale of the Azure AD B2C service. In my opinion, this domain-specific language is not a bad balance between having very little control and allowing full-blown custom scripts using a general programming language. This DSL allows for bug-preventing validation.
The topic of this first part is working with custom policies locally. Specifically, we will be focusing on the Azure AD B2C extension for Visual Studio Code. At the end we will also look at some methods for deploying custom policies to a B2C tenant.
Configuration file and environments
Usually you have a dev/test environment to test the custom policies before deploying them to production. If the same B2C tenant is used, we need different policy ids. And if another tenant is used, then we need different Identity Experience Framework app registration ids. Either way, the policy file contents must be different between environments. Modifying the files manually before deployment would be highly error-prone. This is why the Azure AD B2C extension supports policy settings per environment.
To use this feature, you need to add an appsettings.json file in the same folder as the policies:
{
  "Environments": [
    {
      "Name": "Development",
      "Production": false,
      "Tenant": "myb2ctenant.onmicrosoft.com",
      "PolicySettings": {
        "ProxyIdentityExperienceFrameworkAppId": "ecfcc86d-904a-4585-828f-4cf16ae005da",
        "IdentityExperienceFrameworkAppId": "ff0242a4-0124-4381-8b78-ad9a4938e147"
      }
    }
  ]
}
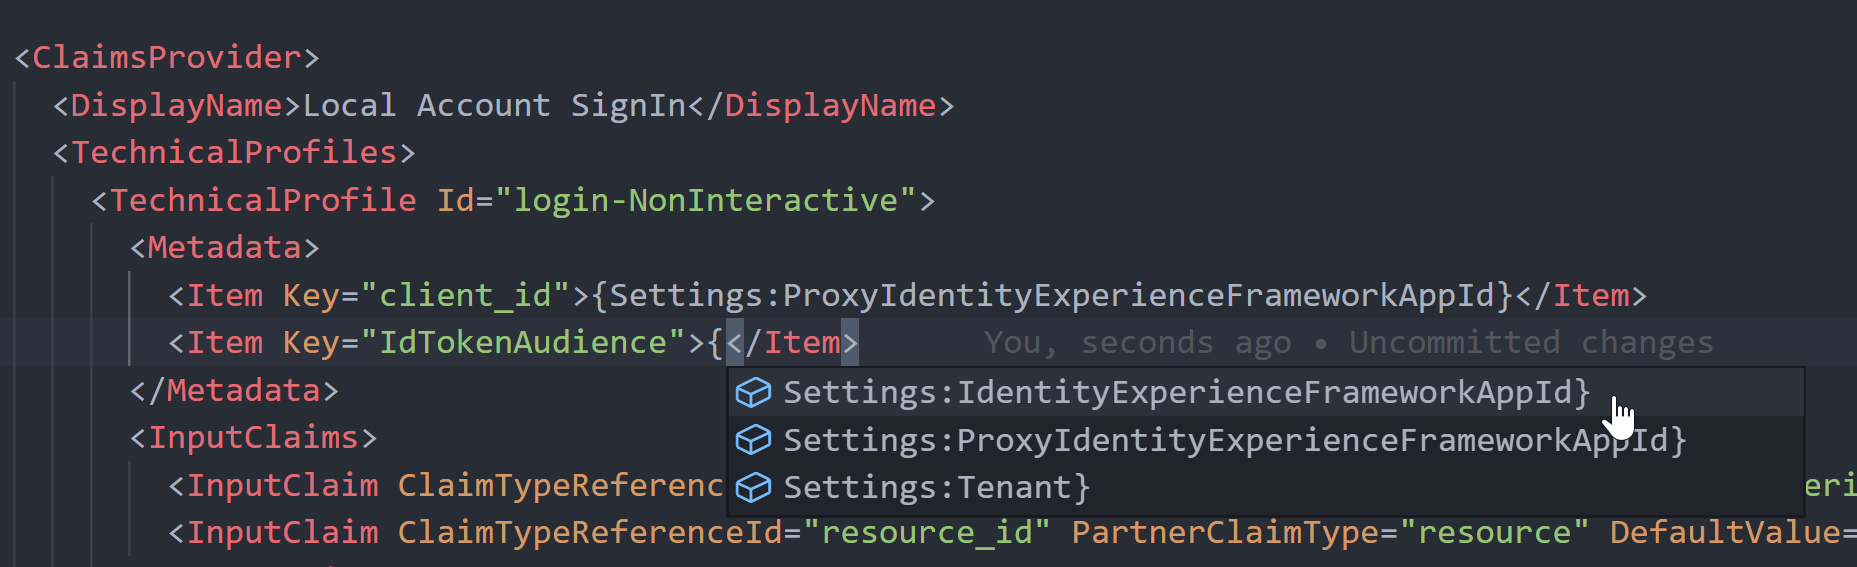
The settings defined under PolicySettings and the Tenant value are available through placeholders.
For example, {Settings:Tenant} will get replaced with myb2ctenant.onmicrosoft.com in the Development version of the policy.
You actually get auto-complete for them:
With the placeholders added, we can build versions of the policies per environment.
In Visual Studio Code, open the command palette (Ctrl+Shift+P on Windows) and run the B2C policy build command.
You should then get an Environments folder,
with a folder under it for each environment that you have defined.
Each of them has versions of the policies with the placeholders replaced.
You can then take the correct environment's policies and deploy them. We'll look at some options for deploying them later in this article.
Application Insights trace
One of the single hardest things with custom policies is figuring out what went wrong when they don't work. Azure AD B2C can fail in various ways; sometimes you get an error returned to the client app, sometimes a "something went wrong" page. The error message returned to the client can sometimes help, but often it does not.
To assist with this,
Application Insights can be used as a "user journey recorder".
It allows you to get detailed logs of what happened during each authentication.
Don't enable it in production though since a lot of sensitive data is logged.
You can use policy settings to conditionally enable the recorder in the environments you want.
What I've done before is to set DeploymentMode in appsettings.json:
{
  "Environments": [
    {
      "Name": "Development",
      "Production": false,
      "Tenant": "myb2ctenant.onmicrosoft.com",
      "PolicySettings": {
        "DeploymentMode": "Development"
      }
    },
    {
      "Name": "Production",
      "Production": true,
      "Tenant": "myb2ctenant.onmicrosoft.com",
      "PolicySettings": {
        "DeploymentMode": "Production"
      }
    }
  ]
}
Then we use it in the "RP" policy files (the files with <RelyingParty> elements):
<!-- Some elements and attributes omitted -->
<TrustFrameworkPolicy
  DeploymentMode="{Settings:DeploymentMode}"
  UserJourneyRecorderEndpoint="urn:journeyrecorder:applicationinsights">
  <RelyingParty>
    <UserJourneyBehaviors>
      <JourneyInsights
        TelemetryEngine="ApplicationInsights"
        InstrumentationKey="your-app-insights-key"
        DeveloperMode="true"
        ClientEnabled="false"
        ServerEnabled="true"
        TelemetryVersion="1.0.0" />
    </UserJourneyBehaviors>
  </RelyingParty>
</TrustFrameworkPolicy>
The traces are only collected when DeploymentMode is set to Development.
The issue with these logs is that it is quite hard to read them in the Azure Portal Application Insights Explorer. Exceptions can be read okay, but the rest of the trace can't.
The VS Code extension helps with reading these traces. First you need to do some setup so it gets access to the Application Insights data. You can follow the instructions here for how to do that.
You should then be able to see traces:
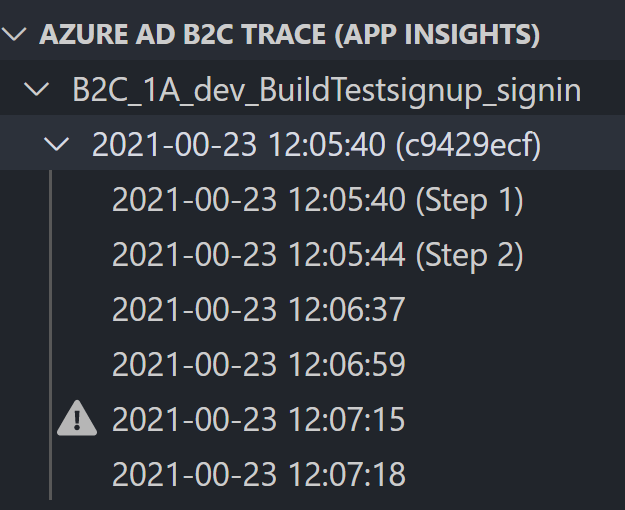
Note that there may be a delay of 5-10 minutes before the traces show up. One of the nice things the extension does is that it groups the traces, tells you which orchestration steps occurred in each trace, and if there were errors. The trace itself is still in JSON format and requires some experience to read, but it essentially tells you what occurred, what claim values were received, results of claim transformations etc.
Here you can see that there was some kind of error in one of the steps. If we open the one with the exclamation mark, we can find this in the JSON:
{
  "Key": "Exception",
  "Value": {
    "Kind": "Handled",
    "HResult": "80131500",
    "Message": "The technical Profile with id \"AAD-UserWriteUsingLogonEmail\" in Policy id \"B2C_1A_dev_BuildTestsignup_signin of Tenant id \"myb2ctenant.onmicrosoft.com\" requires that an error be raised if a claims principal record already exists for storing claims. A claims principal of type \"User\" with identifier claim type id \"signInNames.emailAddress\" does already exist.",
    "Data": {
      "IsPolicySpecificError": true,
      "TenantId": "myb2ctenant.onmicrosoft.com",
      "PolicyId": "B2C_1A_dev_BuildTestsignup_signin",
      "TechnicalProfile.Id": "AAD-UserWriteUsingLogonEmail",
      "ClaimsPrincipal.IdentifierClaim.ClaimTypeId": "signInNames.emailAddress",
      "ClaimsPrincipal.PrincipalType": "User",
      "CreateClaimsPrincipalIfItDoesNotExist": "True",
      "RaiseErrorIfClaimsPrincipalAlreadyExists": "True",
      "RaiseErrorIfClaimsPrincipalDoesNotExist": "False"
    }
  }
}
In this case I tried to register a user with an email that I had previously used in this tenant. This error does actually show up properly in the default UI, but you can get similar info for other errors from the trace. I have had a couple times where I only got a generic "An error occurred" in the trace as well. And a few times when no traces were recorded at all. But those have been pretty rare. Note that even if you don't get traces, there could be exceptions in Application Insights, so remember to check there too.
Policy explorer
The Policy explorer section gives you an outline for the currently visible policy file.
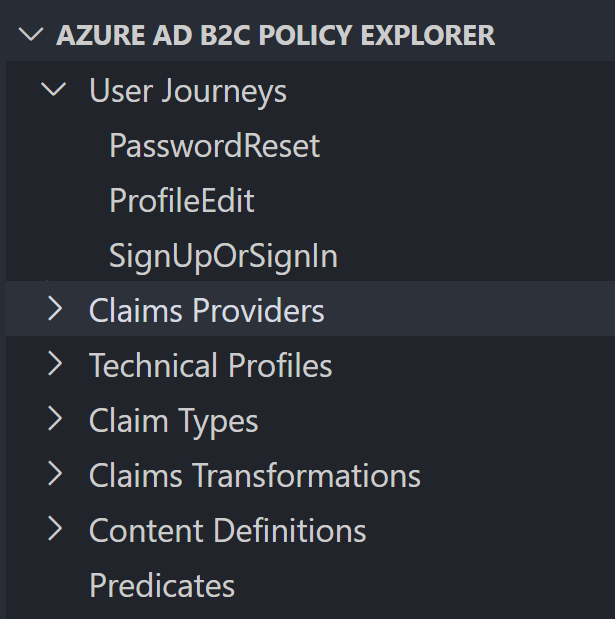
You can for example find a technical profile with specific name through there. I haven't used this so often, but it could be useful in bigger files.
Deploying policies
The most basic approach for deploying custom policies is to upload them one by one through the Azure portal. I find that option tedious.
The extension comes with B2C Upload all policies and B2C Upload current policy commands that you can use from VS Code. You can find instructions how to setup the upload feature in the extension documentation.
Alternatively you could use the open source B2C policy manager app. This allows you to select one of the output folders from the build earlier, and publish them all at once. This has been my preferred tool for manual publishing. After logging in and selecting the right environment's output folder, you can click Select All and Update Policies to update all policies at once. The app takes care to upload them in the correct order as well (base policies must be uploaded first).
In part 2 of this article series, we will look at an automated approach for deployment.
Summary
Thanks for reading this first part on Azure AD B2C custom policy development. Hopefully you found something useful. The Visual Studio Code extension aids development quite a lot, though it is not perfect. Policy settings and the Application Insights trace viewer are definitely the best parts. I didn't go through all the features of the extension here; check their documentation for those. I've put useful links to more documentation in the Links section.
Deploying policies with the described manual approaches isn't the best solution for production policies. You need a repeatable automated approach, and secrets may be required in production policies that you do not want to store in the appsettings.json file in version control. In the next part, we will look at an approach for deploying custom policies using Azure DevOps pipelines.