Testing is a pretty big part of building software in general. So when we build an API, we want to do testing on it. Authentication can create interesting problems for testing though. Usually you want to make sure your authentication and authorization work correctly when running integration tests. So when you use an identity provider like Azure Active Directory to protect your API, you’d want to use that in your local development environment as well, so you aren’t running untested code in Azure.
Swagger UI is one option for building interactive documentation, and one I quite like using. It can be used to do manual testing during development when no proper client application exists (or you don’t want to do testing through the client).
In this article we will look at the configuration that is needed to enable authentication in Swagger UI. It will allow a developer to sign in to their Azure AD account, and execute API actions as if they were using a client applications acting on their behalf. Note that some of this guidance is not specific to Azure AD. Some of it applies to any OAuth 2 identity provider.
I’ve made a sample application that’s up on GitHub that will be used in this article: https://github.com/juunas11/testing-aad-protected-apis. It uses ASP.NET Core 3.0, so make sure you have the .NET Core 3.0 SDK if you want to run the sample app. The newest version of Swashbuckle is used, as the previous version is not compatible with ASP.NET Core 3.0. The setup for the older version used with ASP.NET Core 2.x is very similar, though the Open API classes have had quite many changes.
As you may have noticed, it says “part 1” in the title. I’m planning to make this into a series, where the same sample application will be improved to include other kinds of testing and tools. Here are some that I am thinking:
- Postman (Client Credentials and Code/Implicit flows)
- Integration tests executed as a user / an application
- VS Code HTTP extension
Comment below if you have some other things you’d like to see! :)
App registration in Azure AD
After creating the basic API in Visual Studio 2019, I registered it in my demo Azure AD tenant. We will use the same registration for the Swagger UI as well. This has some advantages that you’ll see later.
To enable authentication in Swagger UI, we need to add its reply URL:
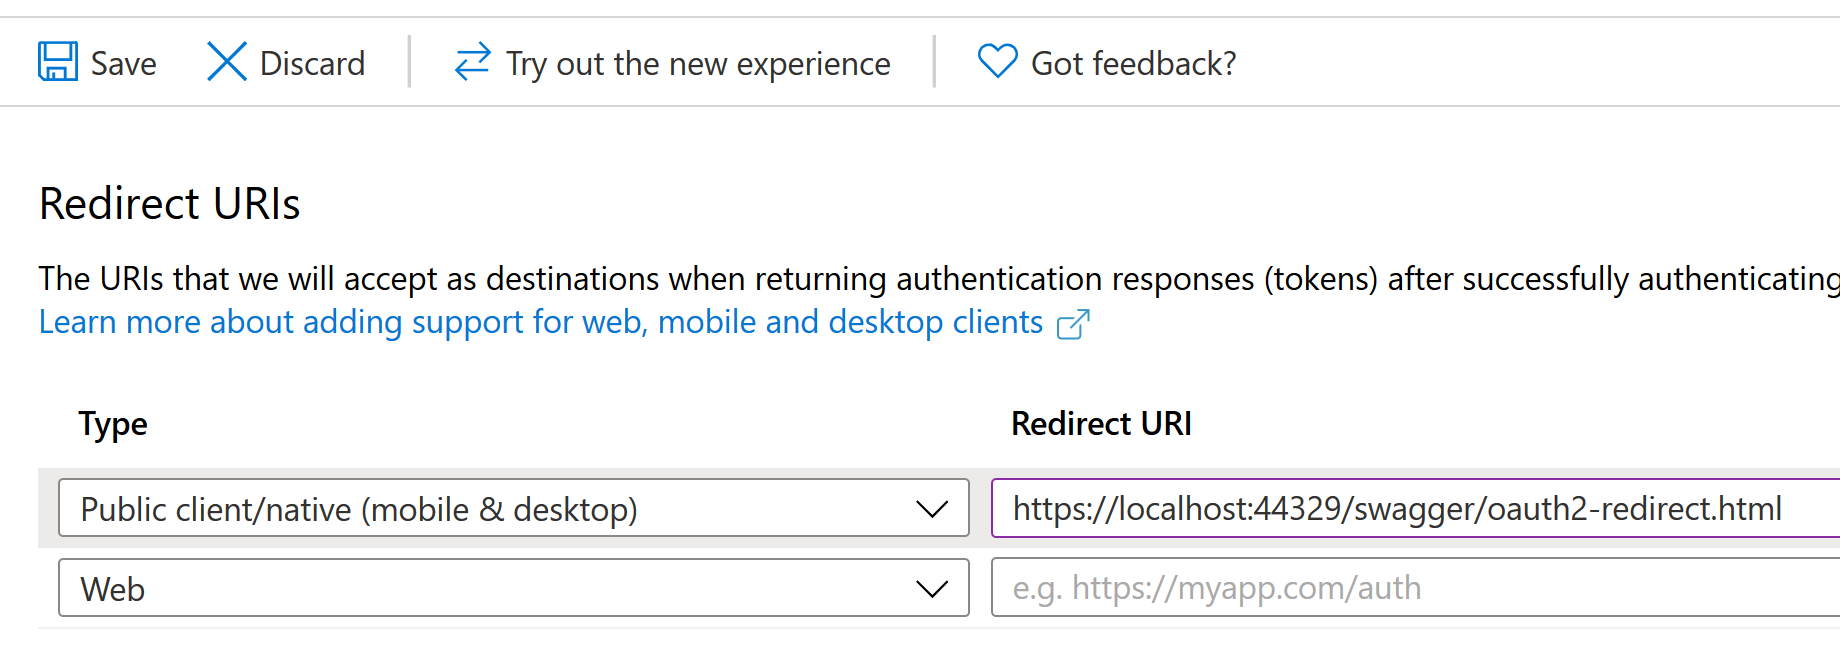
/swagger/oauth2-redirect.html is the default for Swashbuckle (the library the app uses for Swagger UI), so that’s what I defined.
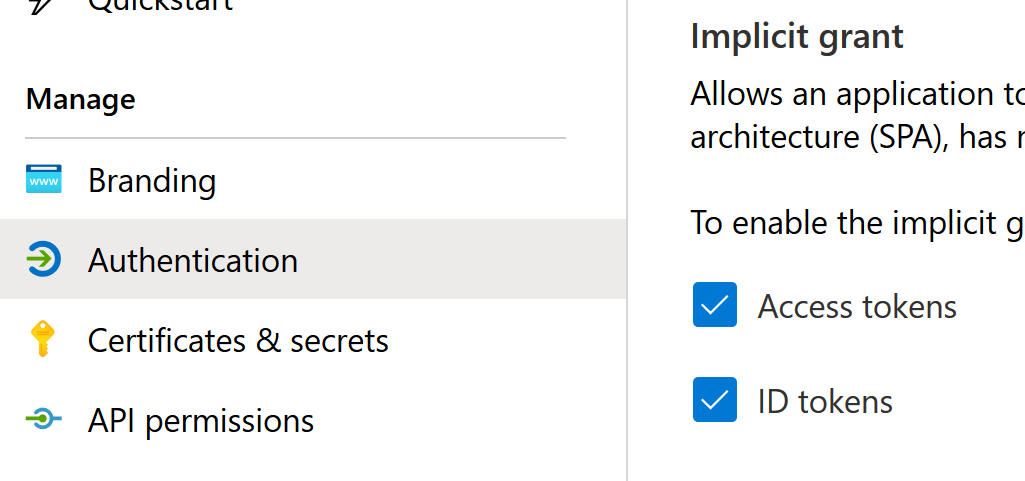
We will be using the implicit grant for authentication, so we need to enable that as well:
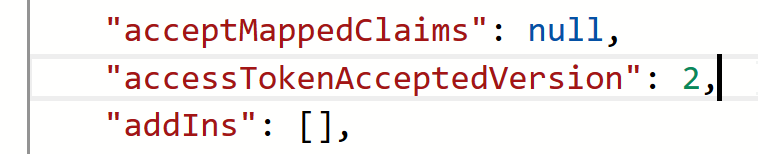
This API will only accept v2 access tokens. That needs to be enabled explicitly in the Manifest:
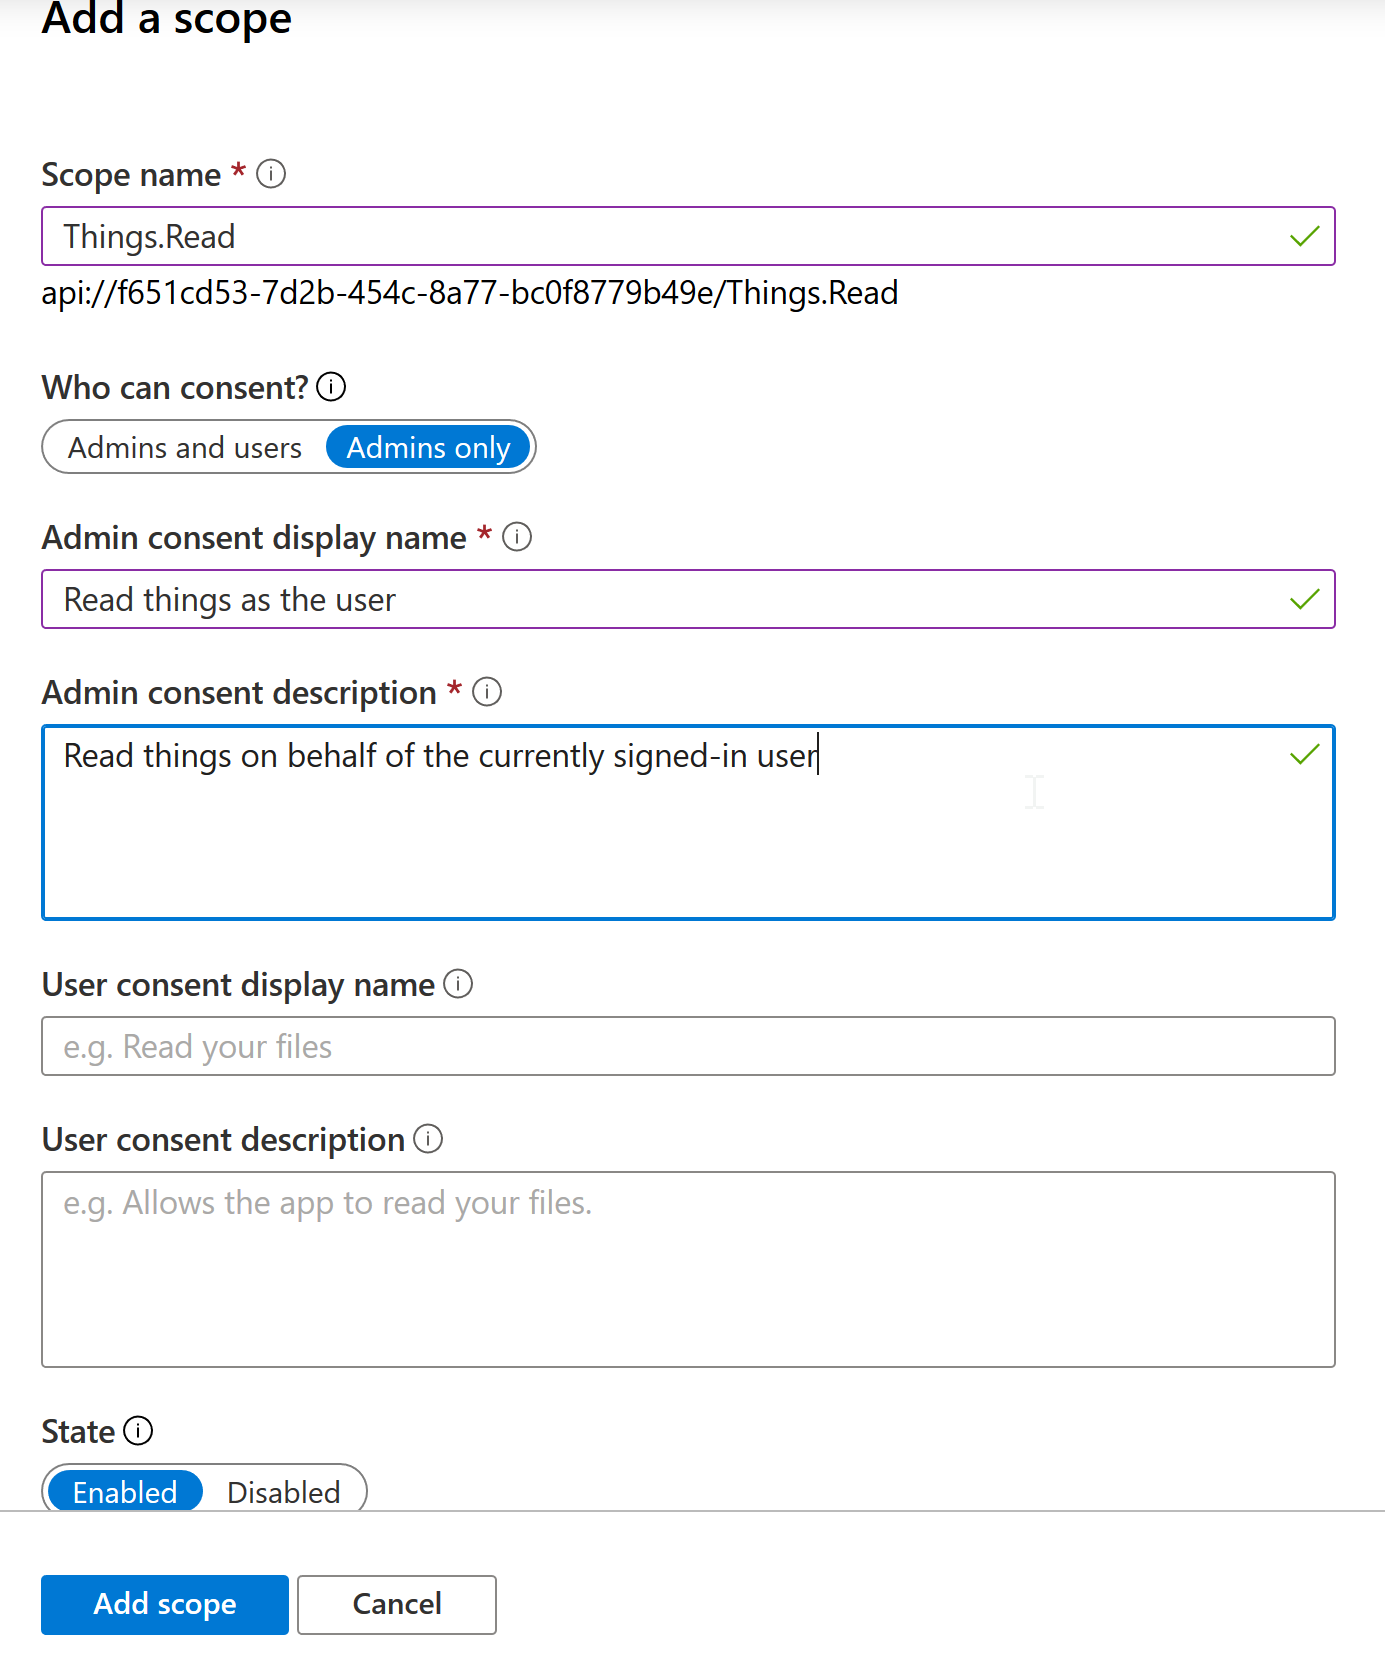
Then I went to the Expose an API tab in the app registration, created an app ID URI, and defined two scopes:

In your API you can define various scopes to allow client applications access only to certain endpoints. Scopes, aka delegated permissions only apply in the context of a user though. An application having one of these permissions can only do those actions on behalf of a user, not by itself. Next time we will look at defining application permissions that allow for service-to-service calls without a signed-in user.
The sample API used here has two actions. One will require the first scope, and the other will require the second scope.
Setting up authentication in Swagger UI
Enabling authentication is done by defining that the API requires authentication through OAuth 2 when setting up the OpenAPI document settings. Here is how we setup the security definition:
o.AddSecurityDefinition("aad-jwt", new OpenApiSecurityScheme
{
    Type = SecuritySchemeType.OAuth2,
    Flows = new OpenApiOAuthFlows
    {
        Implicit = new OpenApiOAuthFlow
        {
            AuthorizationUrl = new Uri(authenticationOptions.AuthorizationUrl),
            Scopes = DelegatedPermissions.All.ToDictionary(p => $"{authenticationOptions.ApplicationIdUri}/{p}")
        }
    }
});
You can find the full setup with comments in the Startup class over at GitHub.
Overall, the definition is quite simple.
We say that we require authentication via OAuth 2,
and support the implicit flow.
The AuthorizationUrl defines where the login page is that Swagger UI will redirect to.
Scopes sets up the list of scopes that the developer can choose from before authenticating.
Here we use a DelegatedPermissions class that holds all the scopes that we support.
We create a Dictionary where the keys are the values that will be passed to Azure AD in the scope parameter.
Azure AD requires them to be the “full scope ids”, so we concatenate the App ID URI with the scope values.
The values in the Dictionary are supposed to be descriptions for the scopes.
Here I just leave them as the scope values, but you could setup descriptions there.
Other flows are also supported, like Authorization Code and Client Credentials. Those however require secrets, and I did not want to involve secret management in this sample as well :) Well, until we get to integration testing with the test host.
As a finishing touch, we add the client id that Swagger UI should use:
app.UseSwaggerUI(o =>
{
    o.SwaggerEndpoint("/swagger/v1/swagger.json", "v1");
    o.OAuthClientId(authenticationOptions.Value.ClientId);
});
If we didn’t specify it here, the user would have to specify it in the dialog.
This is enough to enable login in Swagger UI. However, the token won’t be submitted in requests made from there. The reason is that we haven’t defined the scopes needed to call the operations.
If your API requires a single scope to call, you can actually define the required scope globally. But in most cases that doesn’t work. We often want to limit access that other applications have, so we’ll have multiple scopes that need to be required depending on the action.
So I built something similar to other samples I’ve seen used with Swashbuckle in the past. What we need to make is an operation filter. Swashbuckle has the concept of filters, classes that are called when generating the OpenAPI document. Operation filters are executed when generating the metadata for each operation in the API.
But before we get to that, I want to explain how authorization is done in the sample.
The two operations in ThingsController both have the [Authorize] attribute
applied on them:
[Authorize(Actions.ReadThings)]
[HttpGet]
[ProducesResponseType(StatusCodes.Status200OK, Type = typeof(ThingModel[]))]
public IActionResult Get()
As the authorization policy name, we have defined an action. Actions are defined in the Actions class:
internal static class Actions
{
    public const string ReadThings = "Things/Read";
    public const string ReadOtherThings = "OtherThings/Read";

    public static string[] All => typeof(Actions)
        .GetFields()
        .Where(f => f.Name != nameof(All))
        .Select(f => f.GetValue(null) as string)
        .ToArray();
}
The idea is that any action that can be done in the API is added here.
The All property exposes the full list that it builds using Reflection.
This property is used in Startup to add authorization policies for each action:
services.AddAuthorization(o =>
{
    // Require callers to have at least one valid permission by default
    o.DefaultPolicy = new AuthorizationPolicyBuilder()
        .AddRequirements(new AnyValidPermissionRequirement())
        .Build();
    // Create a policy for each action that can be done in the API
    foreach (string action in Actions.All)
    {
        o.AddPolicy(action, policy => policy.AddRequirements(new ActionAuthorizationRequirement(action)));
    }
});
So we loop the All property,
and add an authorization policy for each action with the name set to the action value.
Now [Authorize(Actions.ReadThings)] maps to a policy.
The authorization requirement is handled by this class:
internal class ActionAuthorizationRequirementHandler : AuthorizationHandler<ActionAuthorizationRequirement>
{
    protected override Task HandleRequirementAsync(
        AuthorizationHandlerContext context,
        ActionAuthorizationRequirement requirement)
    {
        // Checks the user has a permission accepted for this action
        string[] delegatedPermissions = context.User.FindAll(Claims.ScopeClaimType).Select(c => c.Value).ToArray();
        string[] acceptedDelegatedPermissions = AuthorizedPermissions.DelegatedPermissionsForActions[requirement.Action];

        if (acceptedDelegatedPermissions.Any(accepted => delegatedPermissions.Any(available => accepted == available)))
        {
            context.Succeed(requirement);
        }

        return Task.CompletedTask;
    }
}
It checks what scopes the caller has, what scopes are accepted by this action, and sees if there is a match.
Here you could also check the user’s roles, or any other access permissions, to see if the user is allowed to call this action.
The AuthorizedPermissions class looks like this:
internal static class AuthorizedPermissions
{
    /// <summary>
    /// Contains the allowed delegated permissions for each action.
    /// If the caller has one of the allowed ones, they should be allowed
    /// to perform the action.
    /// </summary>
    public static IReadOnlyDictionary<string, string[]> DelegatedPermissionsForActions = new Dictionary<string, string[]>
    {
        [Actions.ReadThings] = new[] { DelegatedPermissions.ReadThings },
        [Actions.ReadOtherThings] = new[] { DelegatedPermissions.ReadOtherThings }
    };
}
So the Things.Read scope is accepted for the ReadThings action, and the OtherThings.Read scope is accepted for the ReadOtherThings action.
Alright so how do we add these scope requirements to the OpenAPI document? Here is the operation filter:
internal class OAuthSecurityRequirementOperationFilter : IOperationFilter
{
    private readonly string _appIdUri;

    public OAuthSecurityRequirementOperationFilter(IOptions<AuthenticationOptions> authenticationOptions)
    {
        _appIdUri = authenticationOptions.Value.ApplicationIdUri;
    }

    public void Apply(OpenApiOperation operation, OperationFilterContext context)
    {
        // Get custom attributes on action and controller
        object[] attributes = context.ApiDescription.CustomAttributes().ToArray();
        if (attributes.OfType<AllowAnonymousAttribute>().Any())
        {
            // Controller / action allows anonymous calls
            return;
        }

        AuthorizeAttribute[] authorizeAttributes = attributes.OfType<AuthorizeAttribute>().ToArray();
        if (authorizeAttributes.Length == 0)
        {
            return;
        }

        // Policy name is always an action defined in Actions
        // Resolve the actions, from them derive the accepted scopes, get distinct values
        string[] scopes = authorizeAttributes
            .Select(attr => attr.Policy)
            .SelectMany(action => AuthorizedPermissions.DelegatedPermissionsForActions[action])
            .Distinct()
            .Select(scope => $"{_appIdUri}/{scope}") // Combine scope id with app id URI to form full scope id
            .ToArray();

        operation.Security.Add(new OpenApiSecurityRequirement
        {
            {
                new OpenApiSecurityScheme
                {
                    Reference = new OpenApiReference
                    {
                        Type = ReferenceType.SecurityScheme,
                        Id = "aad-jwt"
                    },
                    UnresolvedReference = true
                },
                scopes
            }
        });
    }
}
It’s a bit long, so let’s go through it part by part.
First, we use dependency injection to get the App ID URI from configuration:
private readonly string _appIdUri;

public OAuthSecurityRequirementOperationFilter(IOptions<AuthenticationOptions> authenticationOptions)
{
    _appIdUri = authenticationOptions.Value.ApplicationIdUri;
}
Then we get attributes assigned at action- and controller-level,
and exit if an [AllowAnonymous] attribute is present:
// Get custom attributes on action and controller
object[] attributes = context.ApiDescription.CustomAttributes().ToArray();
if (attributes.OfType<AllowAnonymousAttribute>().Any())
{
    // Controller / action allows anonymous calls
    return;
}
Then we find the [Authorize] attributes,
and exit if none are found:
AuthorizeAttribute[] authorizeAttributes = attributes.OfType<AuthorizeAttribute>().ToArray();
if (authorizeAttributes.Length == 0)
{
    return;
}
Now we can figure out which actions are present (which are also the policy names), get the scopes allowed for each of them, and construct a distinct set from them:
// Policy name is always an action defined in Actions
// Resolve the actions, from them derive the accepted scopes, get distinct values
string[] scopes = authorizeAttributes
    .Select(attr => attr.Policy)
    .SelectMany(action => AuthorizedPermissions.DelegatedPermissionsForActions[action])
    .Distinct()
    .Select(scope => $"{_appIdUri}/{scope}") // Combine scope id with app id URI to form full scope id
    .ToArray();
Then we can add the security requirement:
operation.Security.Add(new OpenApiSecurityRequirement
{
    {
        new OpenApiSecurityScheme
        {
            Reference = new OpenApiReference
            {
                Type = ReferenceType.SecurityScheme,
                Id = "aad-jwt"
            },
            UnresolvedReference = true
        },
        scopes
    }
});
Now everything should work! The OpenAPI document will contain the security requirements, and that will make Swagger UI send the access token as part of the requests.
Testing the API through Swagger UI
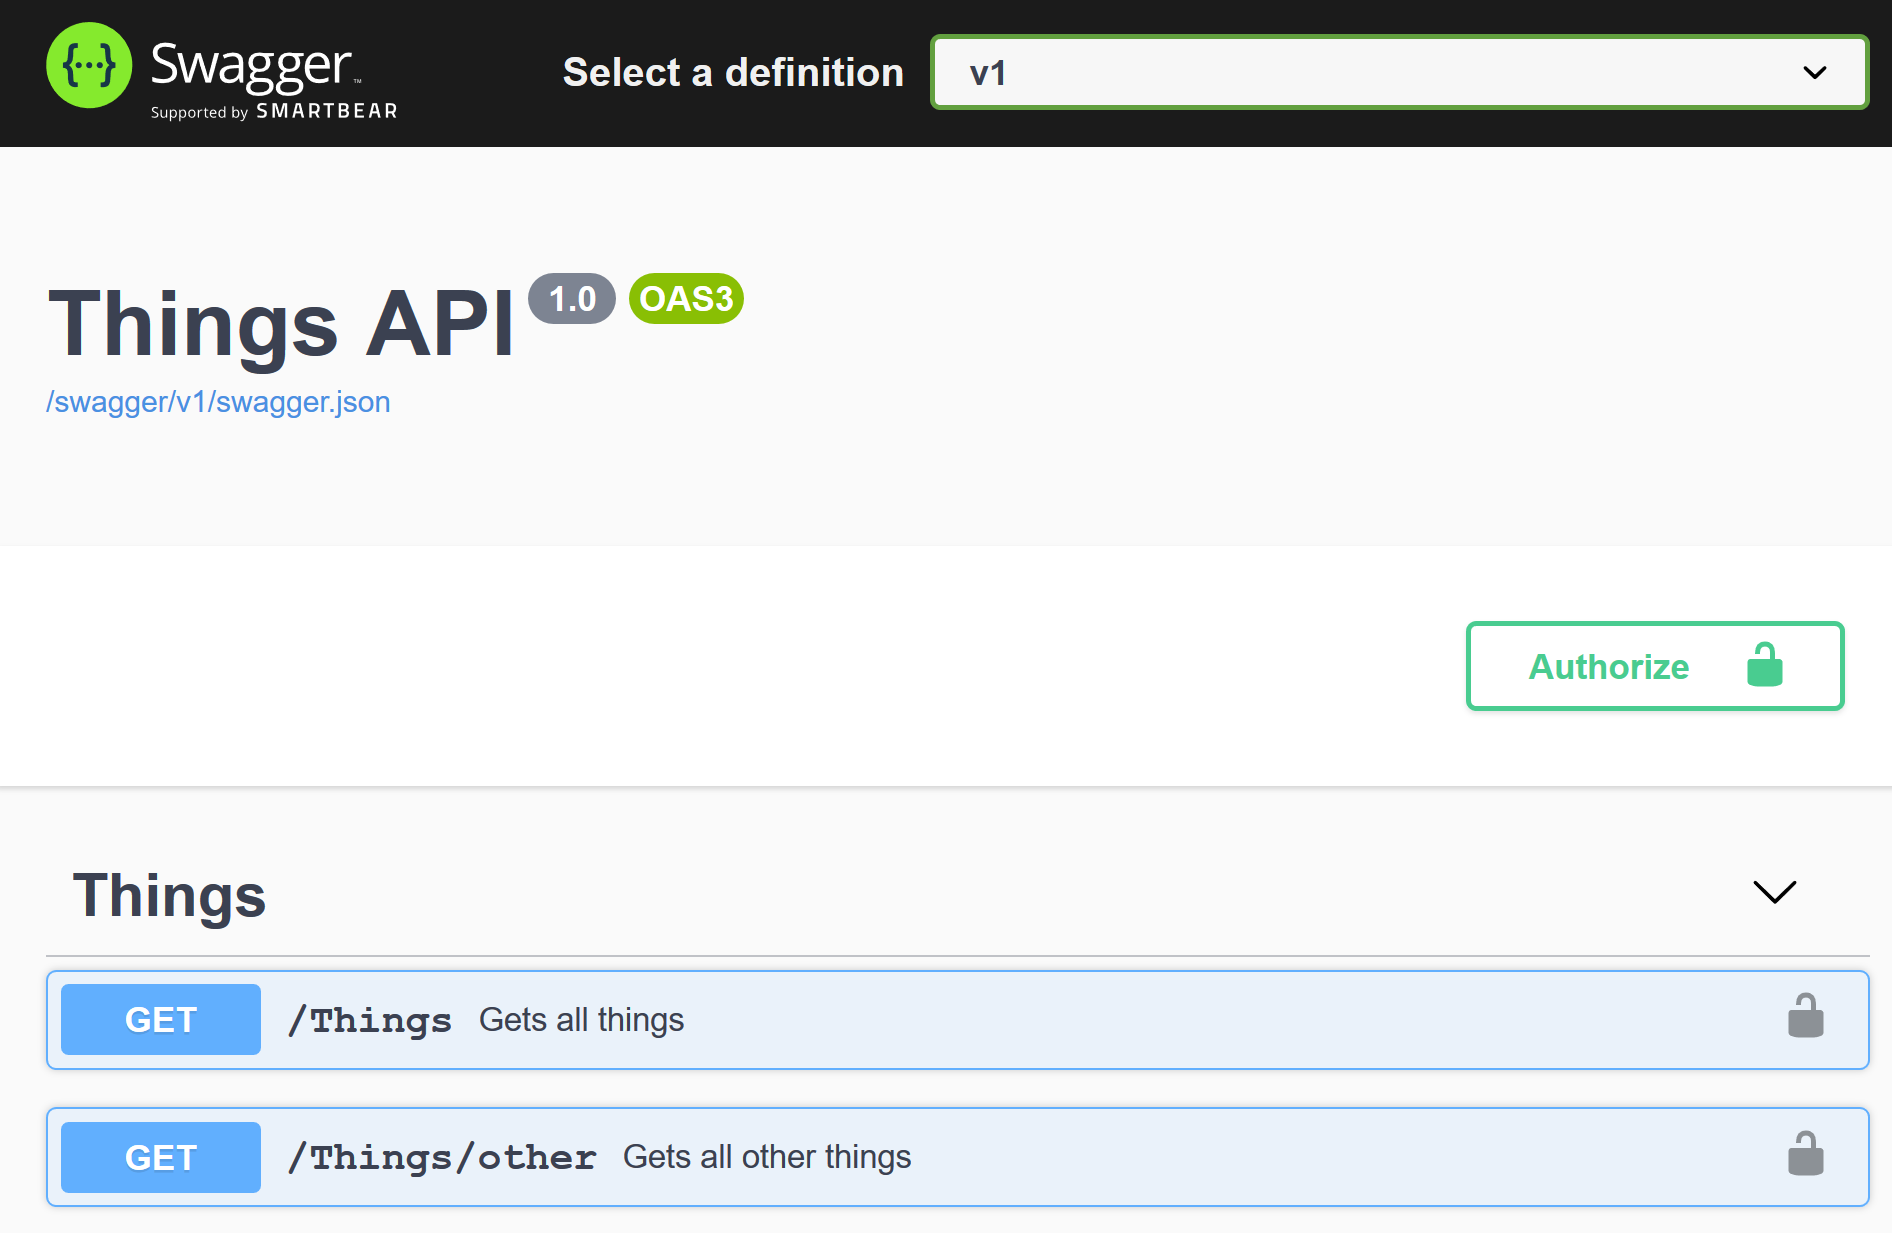
If I run the sample API in Visual Studio, it opens Swagger UI:
We can try to call one of the actions without authentication:
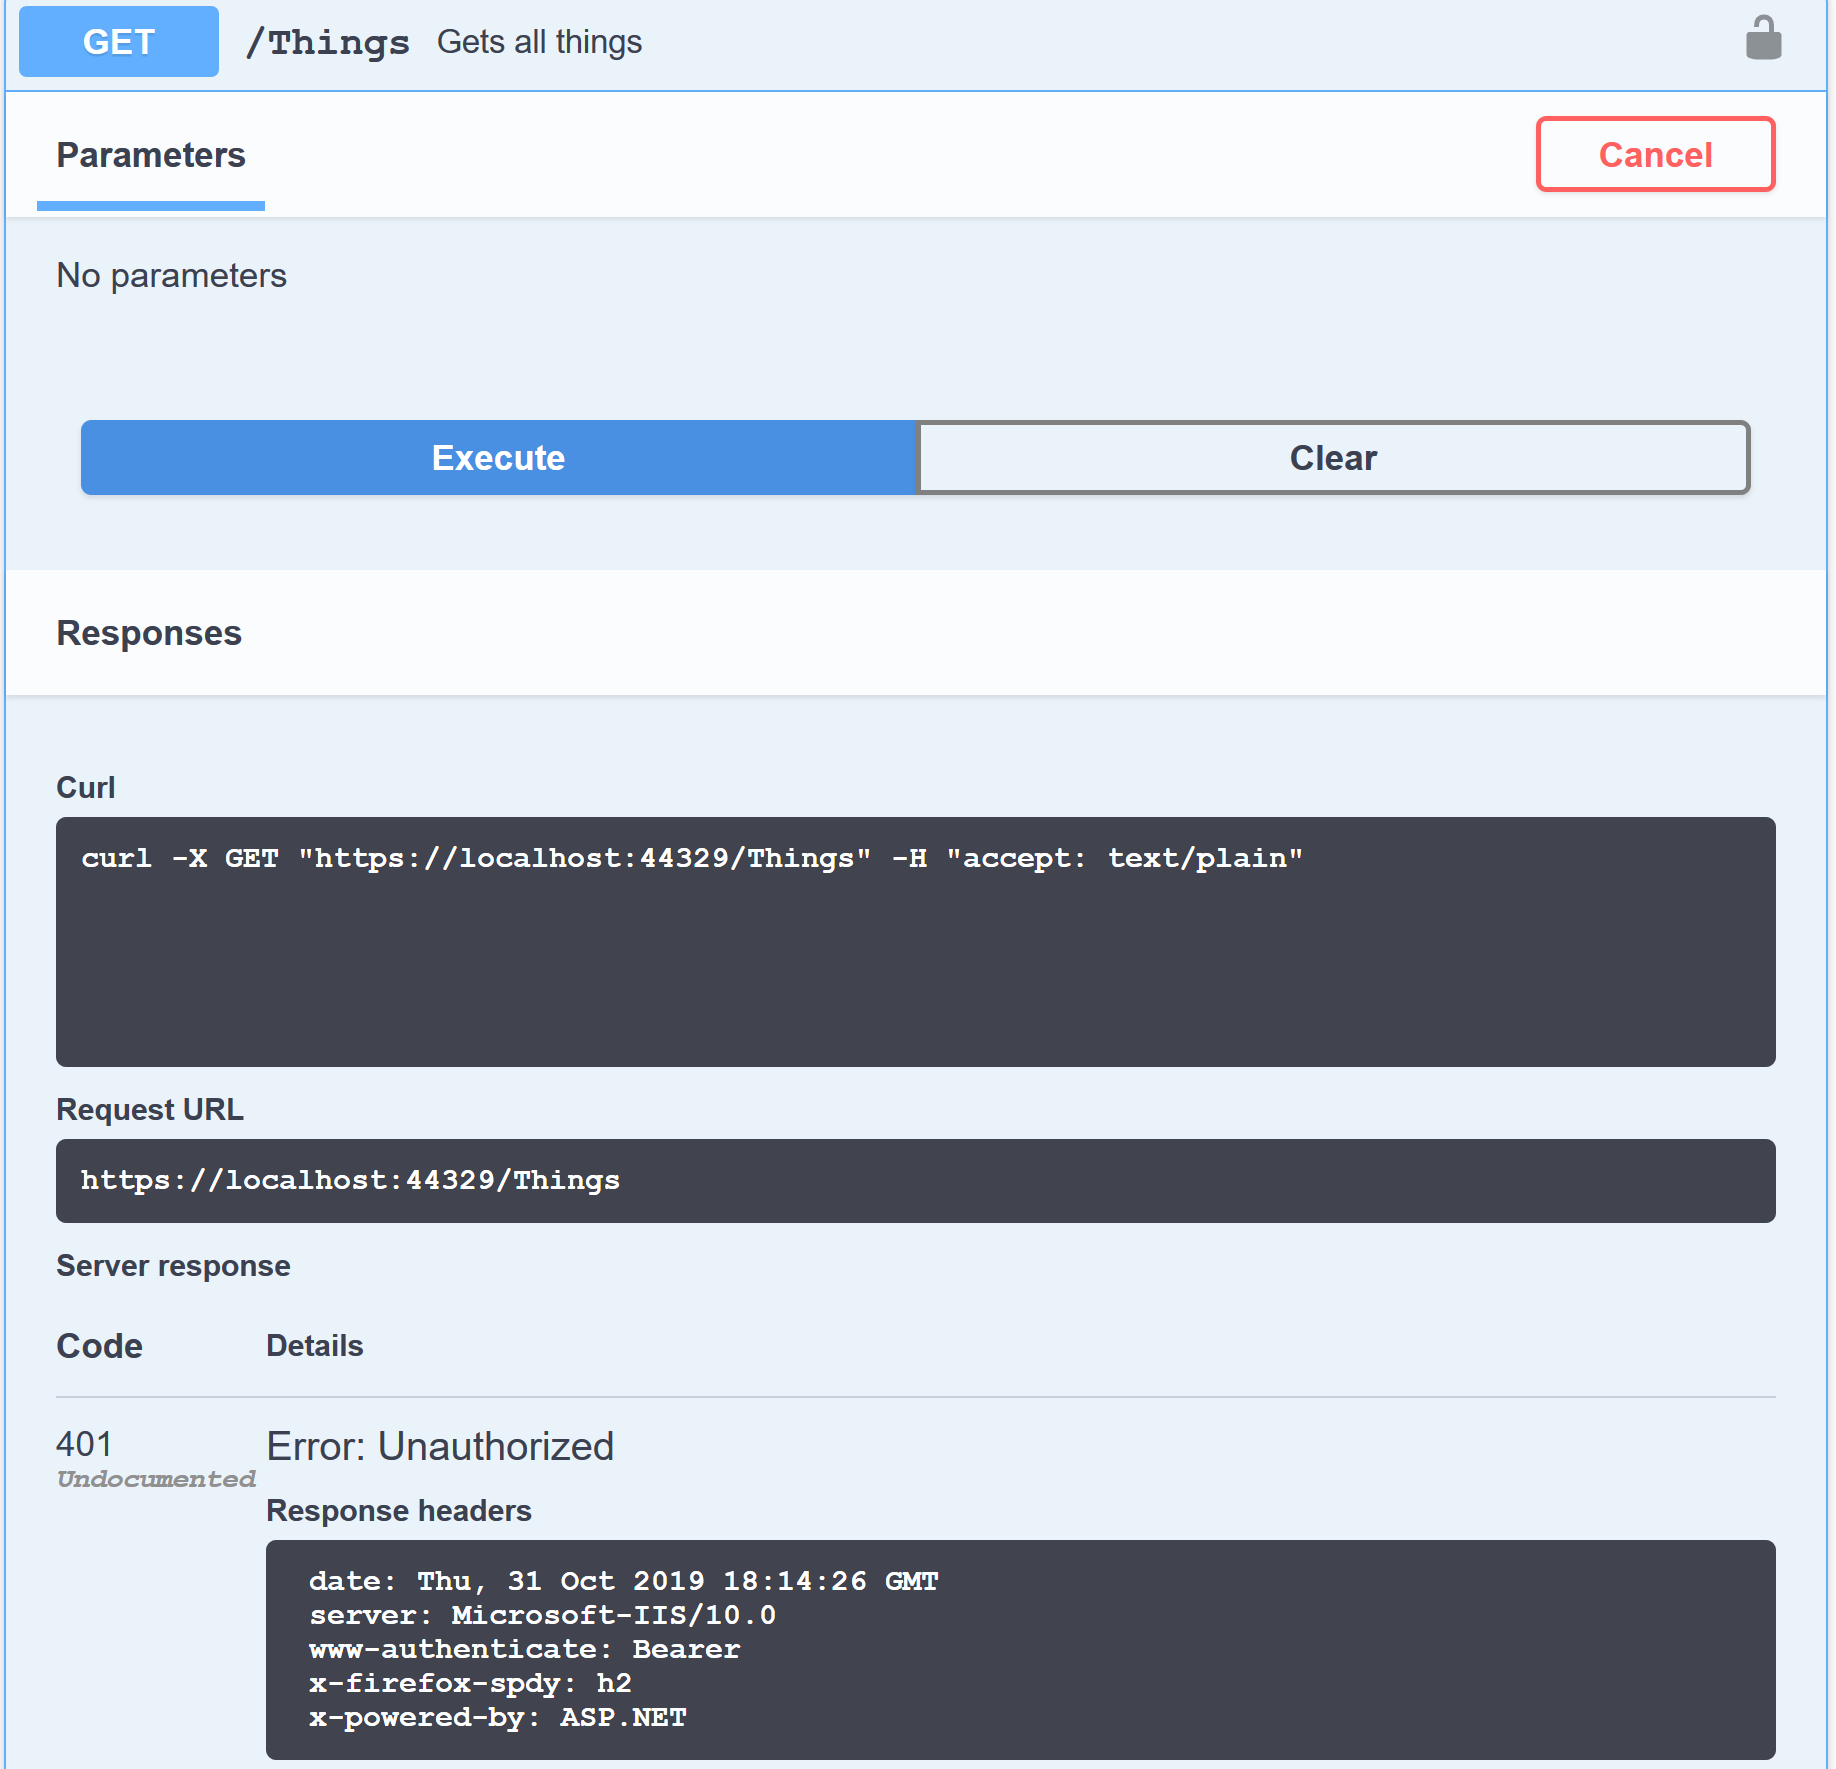
That results in a 401 Unauthorized response. Which is expected, since we have no access token in the request.
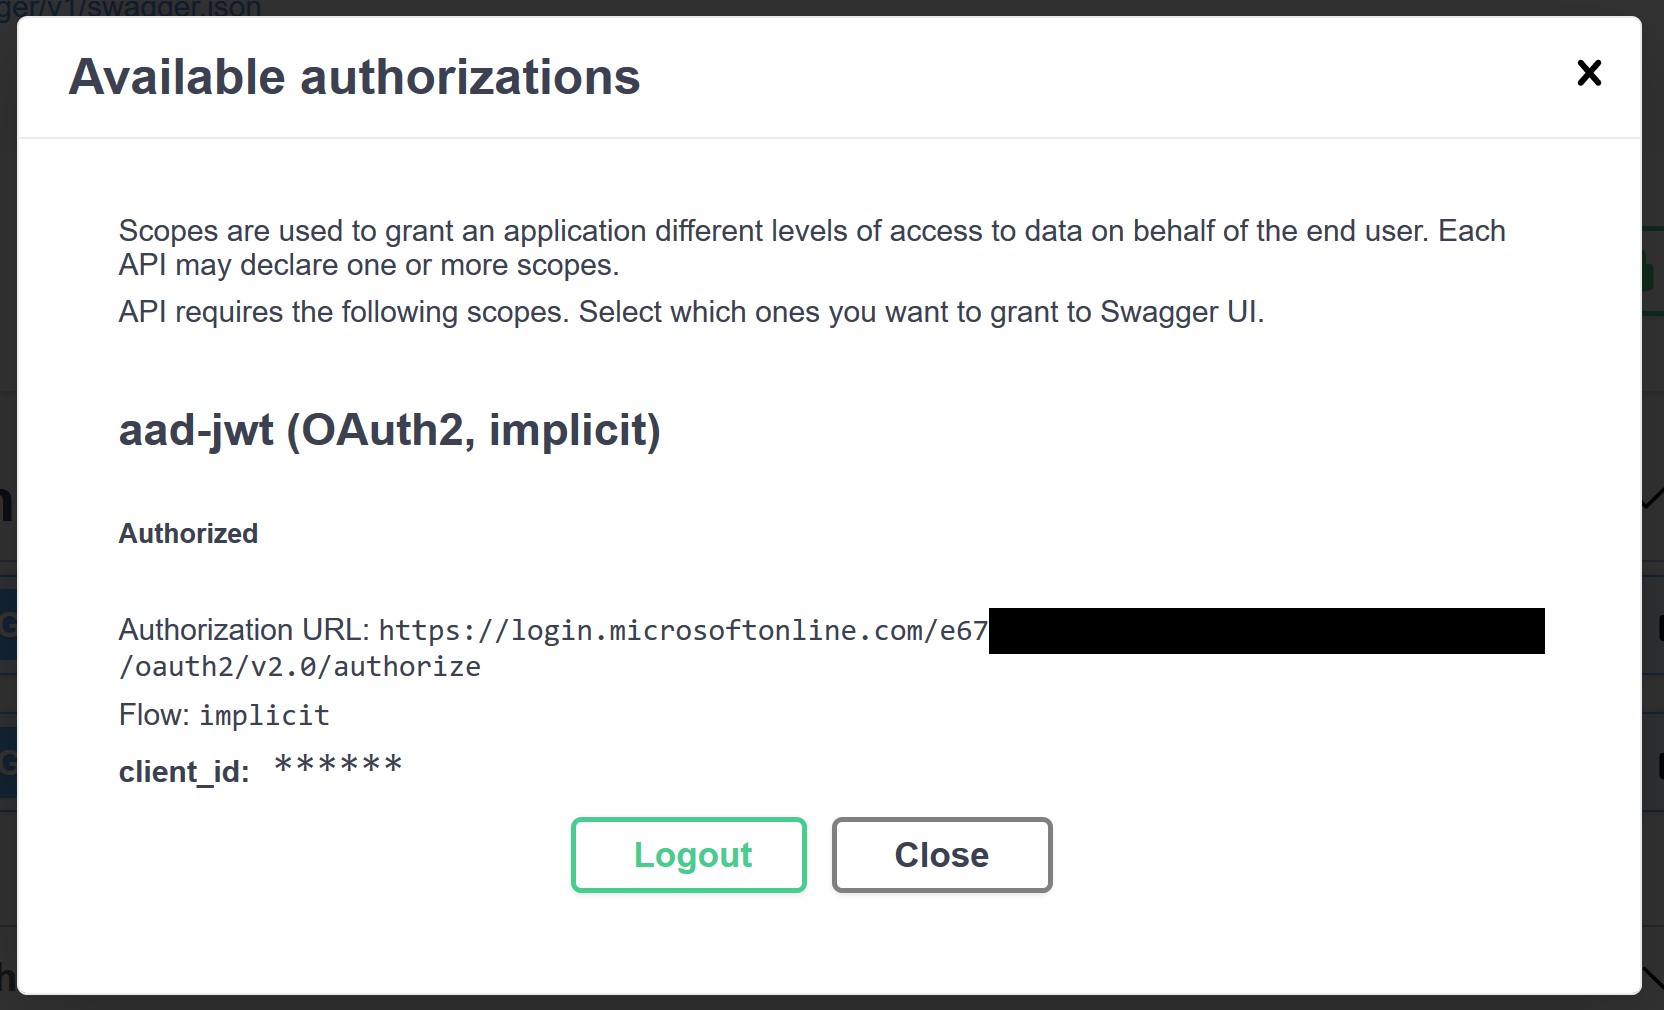
Now let’s authenticate. If we click Authorize, Swagger UI shows this dialog:
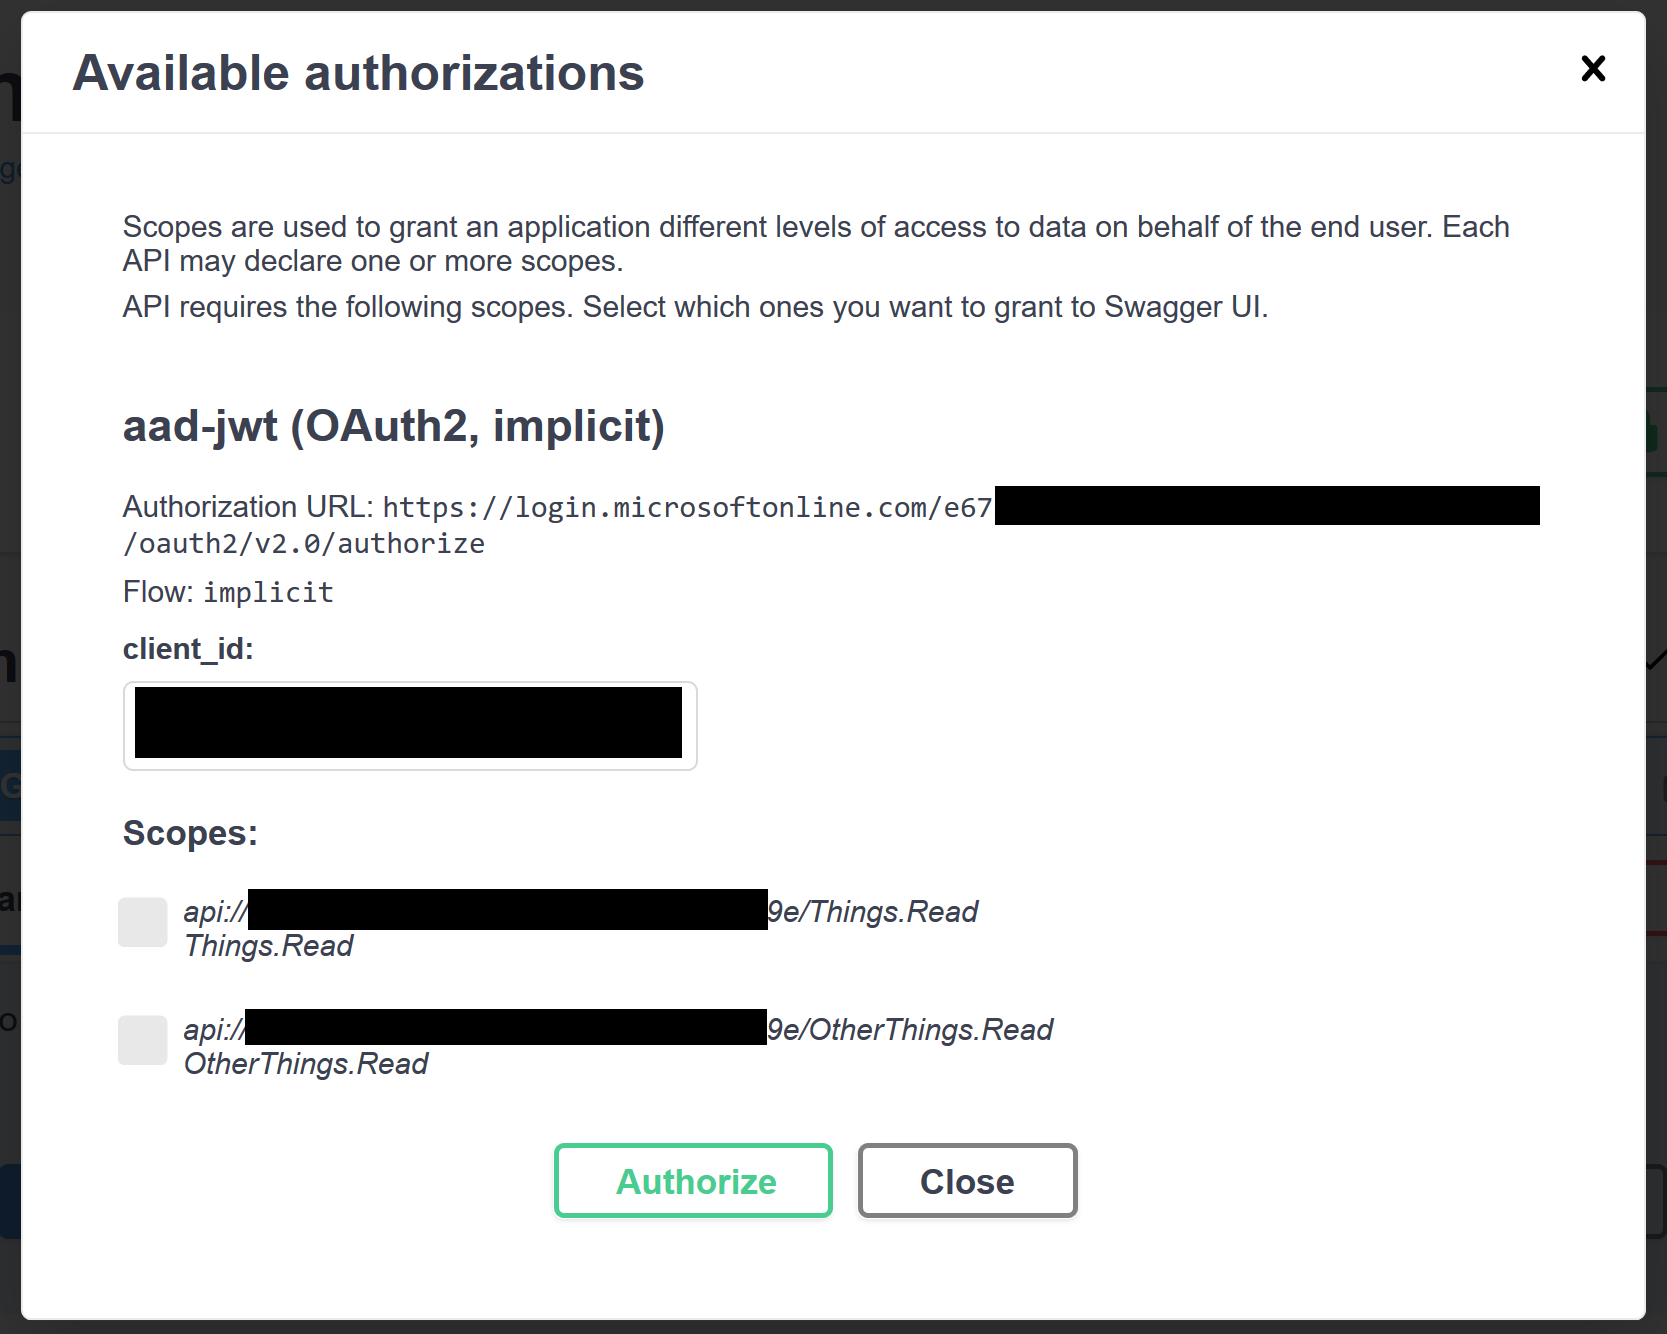
Here we can choose what scopes we want in the access token. This is where we actually have an advantage when we use the API’s app registration for Swagger UI instead of making an app registration specifically for Swagger UI. You see, when we use the same app registration, the scopes in the access token will always be the ones we select here. If we had separate app registrations, we would always get the scopes that have been consented so far. So there would be no way to remove scopes from the access token. Note that this only works because we use the v2 endpoint.
For the first test, I’ll select only the Things.Read scope.
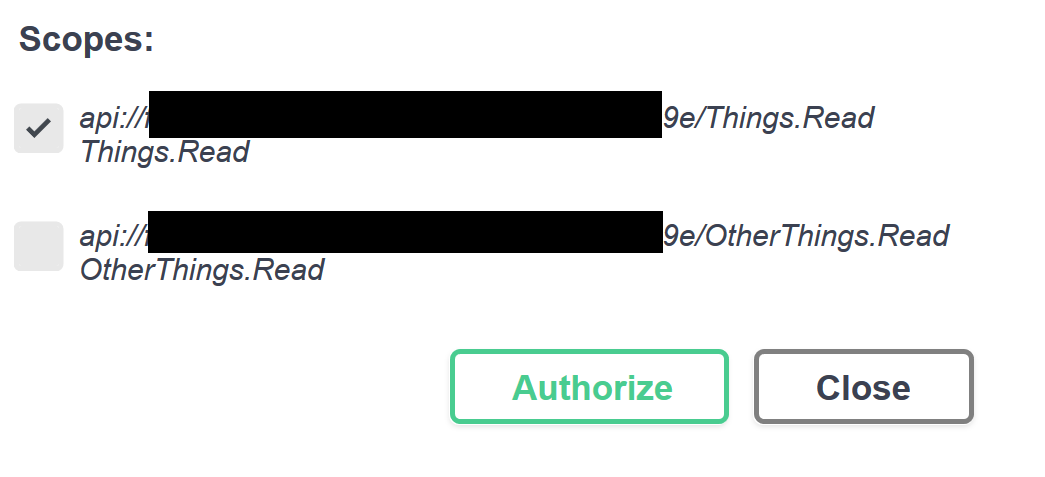
After clicking Authorize in the dialog, the Azure AD login page is shown. I logged in with my user account, and was returned to Swagger UI, where the dialog content has now changed:
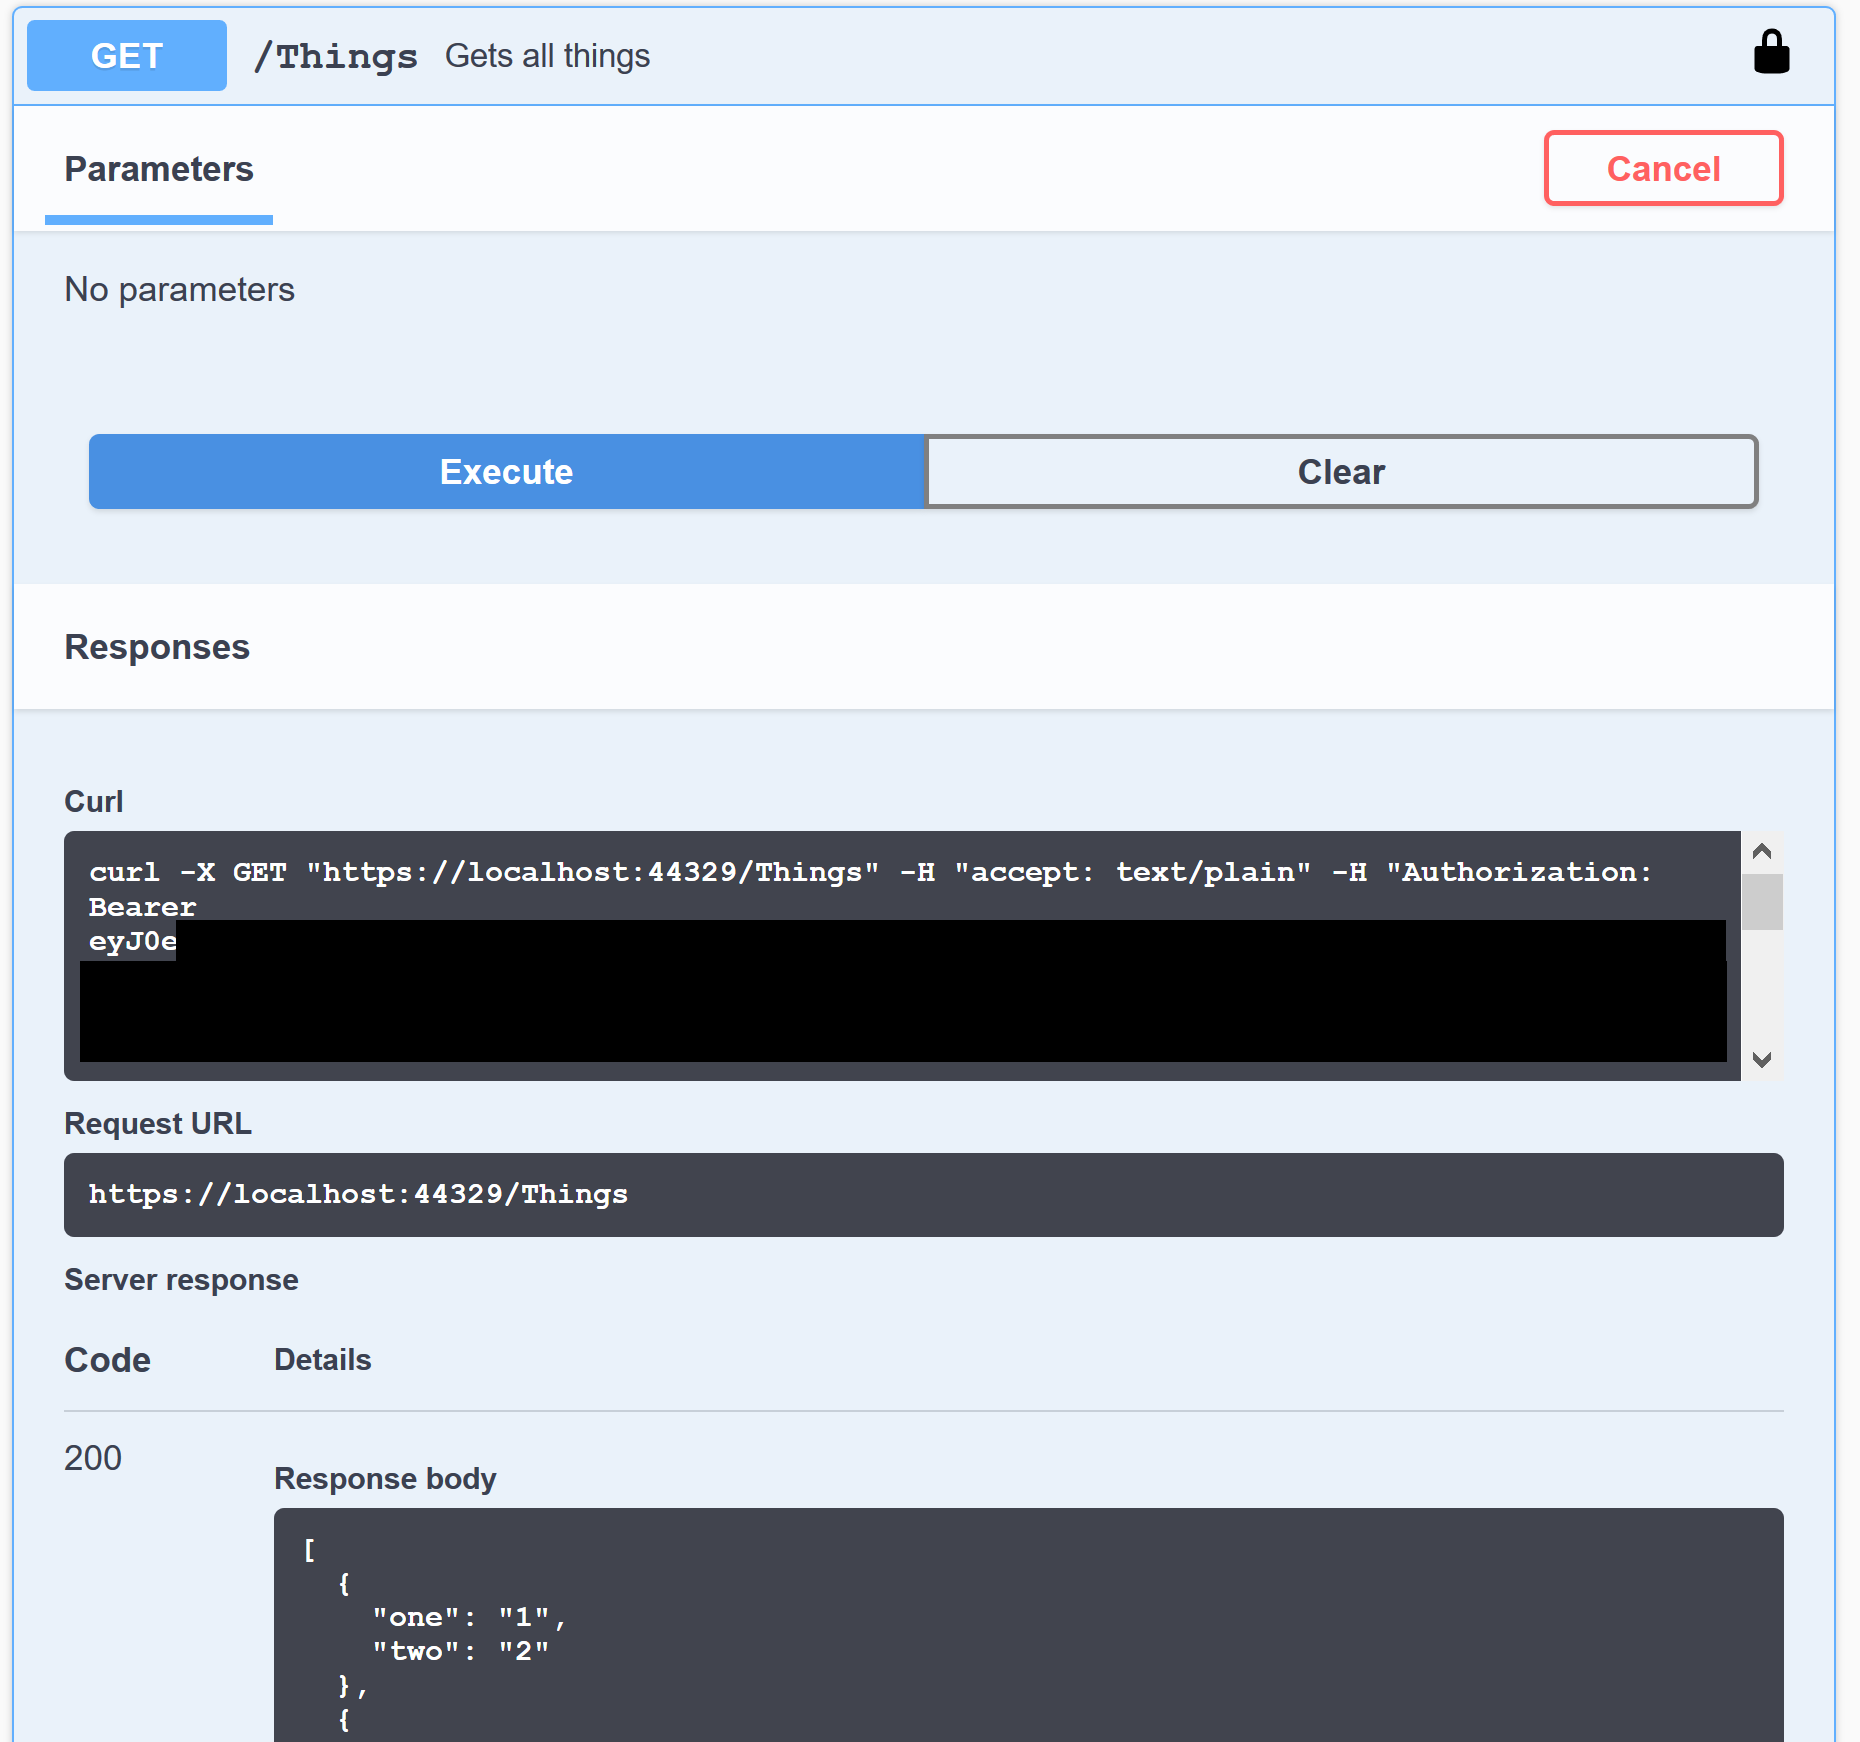
We can click Close, and try to run the first action again. This time it succeeds:
However, if we try to call the second action, it will fail. This time with a 403 Forbidden:
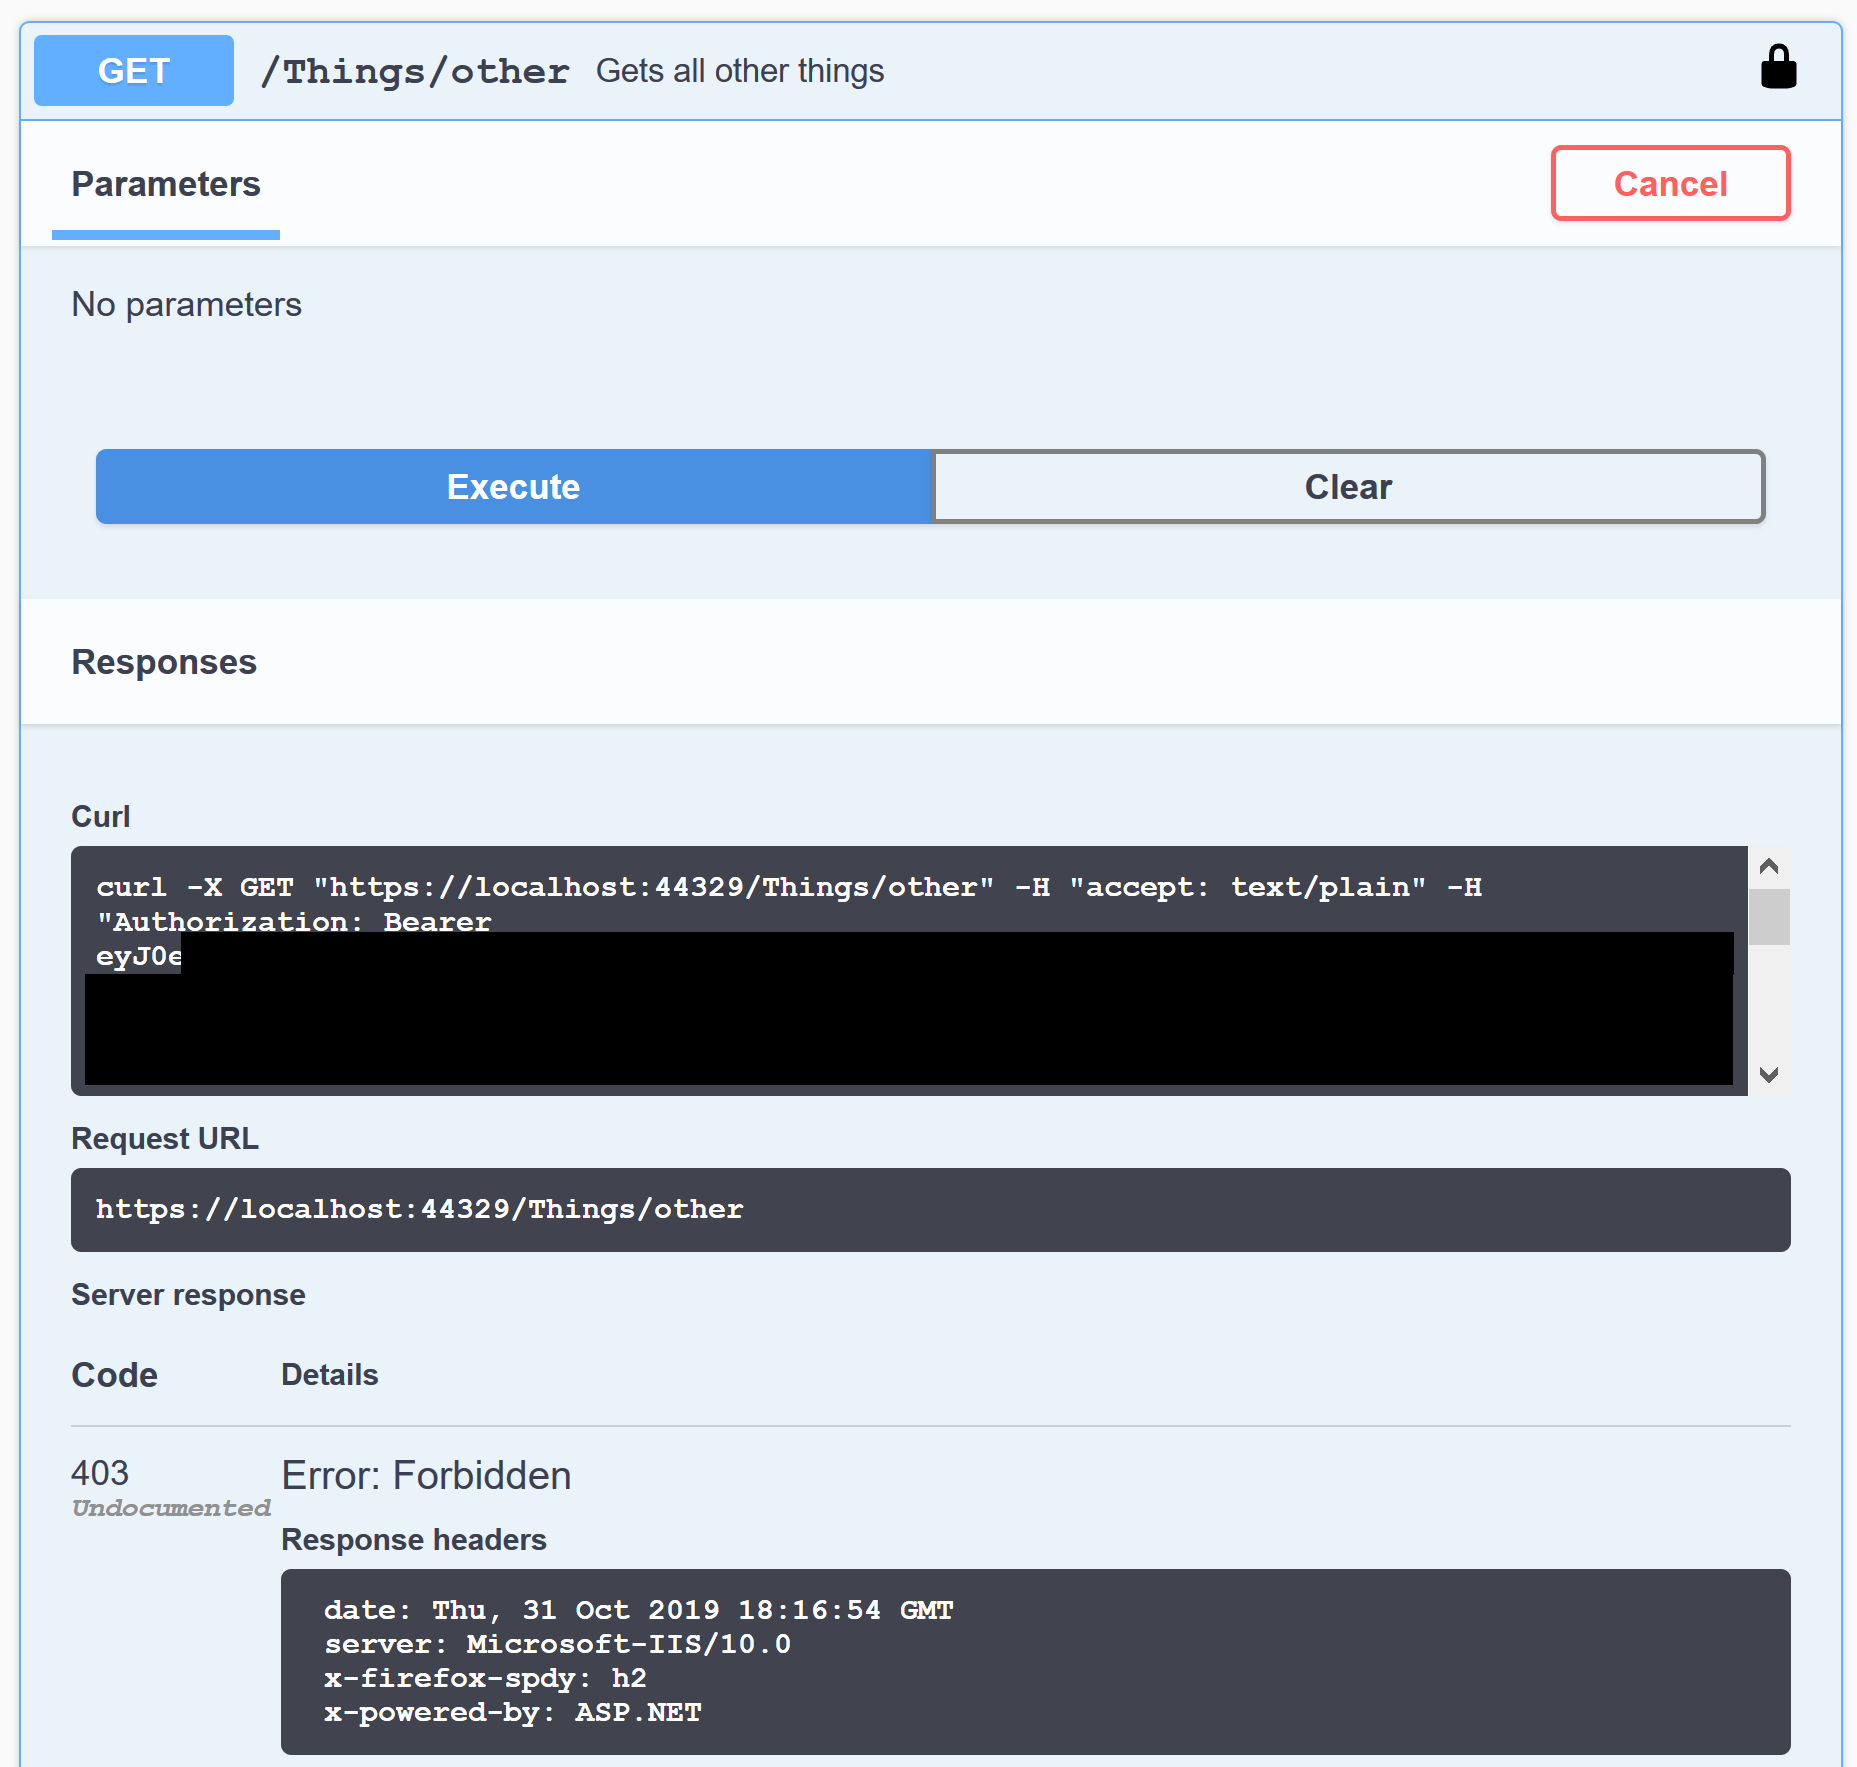
This is because it requires the scope that we did not select in the login dialog 😀 So let’s click Authorize -> Logout to remove the access token. Now we can select both scopes and login again:

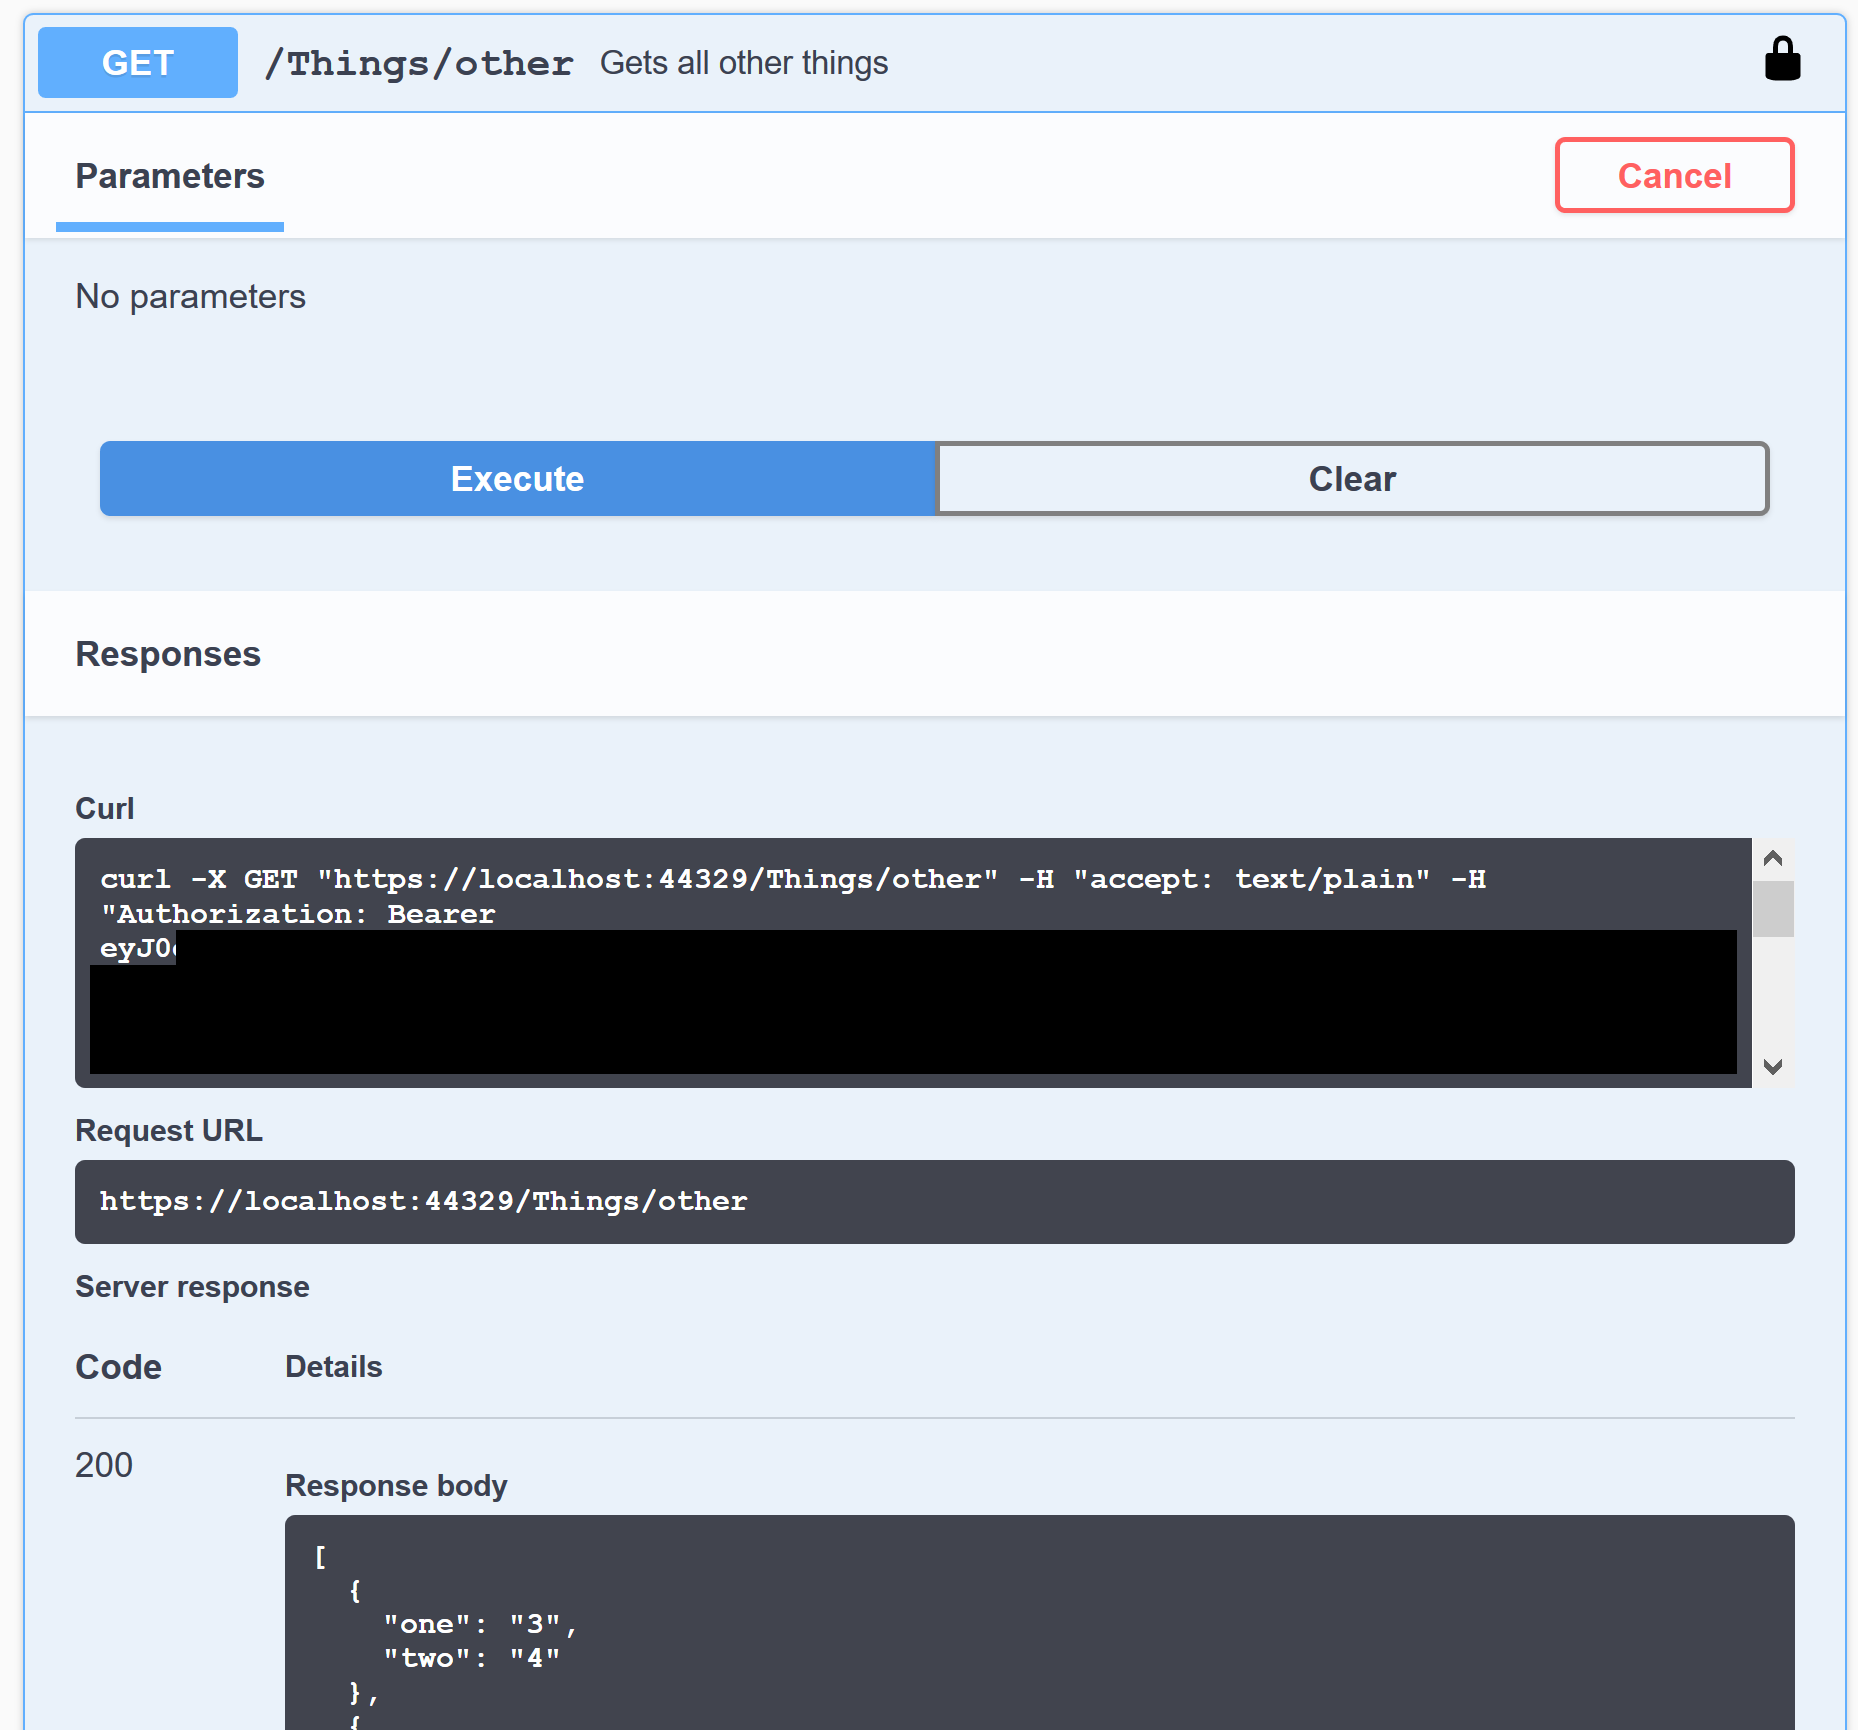
Now if we call the second action, it also succeeds:
So this is pretty nice, we can freely choose what scopes the access token will contain, and see that our authorizations work the way we want! Though it would be nice if there was an option to select scopes by default…
Summary
Some configuration is needed to enable authentication in Swagger UI. But once it is setup, it’s pretty cool to be able to test the API in the development environment with an almost identical authentication configuration as what will be used in production. We are able to call the API on behalf of a signed-in user, just as any client application could. No need to disable authentication in development just for testing :)
Hopefully this was useful, until next time!
Links
- Sample app on GitHub: https://github.com/juunas11/testing-aad-protected-apis
- Swashbuckle.AspNetCore: https://github.com/domaindrivendev/Swashbuckle.AspNetCore
- What is OpenAPI: https://swagger.io/docs/specification/about/