In the previous parts, we have looked at testing an Azure AD-protected API using Swagger UI and Postman.
This time instead of manual testing, we will make automated integration tests that make testing the API’s behaviour easy. They can also confirm the API conforms to its contract. But the authentication requirement presents some challenges.
Issues with testing APIs that require authentication
As far as I see it, there are three strategies to testing an API that requires callers to authenticate:
- Actually authenticate each call with the same method used in production
- Authenticate the calls with a fake authentication method that is special to testing
- Skip authentication entirely in testing
Out of these options, I always prefer option 1 (authenticate properly). If it is more trouble than it’s worth, then option 2 (fake authentication method). But I would not choose to skip authentication requirements in testing as that makes the tests less valuable. Testing that authorization works as intended can be critical.
In this article, we will see how to do option 1 using XUnit with the same API from previous parts. You can find the source code on GitHub. The sample utilizes Azure AD, but most of this should be applicable to an API using any OpenID Connect / OAuth 2 identity provider.
Implementation overview
We want the integration tests to acquire access tokens from Azure AD using credentials stored in an Azure Key Vault. These credentials include application credentials and user credentials.
When running the tests locally, we can use the developer’s user account to access Key Vault. In an automated testing pipeline, the credentials can be passed directly to the test runner, or Key Vault access credentials can be passed and then used to get the credentials. In the next part of this article series, I’ll show an approach with GitHub Actions.
To run tests as a user, we need to acquire access tokens using the ROPC flow. I’ve talked about this flow before, and I generally advise people to stay away from it. However, automated testing is one case where I’d say it has a use. But, make sure you do not use a user in a production AAD tenant.
Running tests as an app is relatively simple, using the client credentials flow. Though, again, this app should not be registered in a production AAD tenant.
Creating the test project
You can see the commit on GitHub to see all the changes done to the sample to add the integration tests.
The test project was created in Visual Studio using the xUnit Test Project (.NET Core) template. To support running the API app in-memory using the Microsoft.AspNetCore.Mvc.Testing library, the csproj file needed some changes. All the other necessary dependencies were also added:
<Project Sdk="Microsoft.NET.Sdk.Web">

  <PropertyGroup>
    <TargetFramework>netcoreapp3.0</TargetFramework>
    <IsPackable>false</IsPackable>
    <UserSecretsId>c5961393-e80c-40d1-84f5-34416fbcb979</UserSecretsId>
  </PropertyGroup>

  <ItemGroup>
    <PackageReference Include="Microsoft.Extensions.Configuration.AzureKeyVault" Version="3.0.1" />
    <PackageReference Include="Microsoft.Extensions.Configuration.UserSecrets" Version="3.0.1" />
    <PackageReference Include="Microsoft.Identity.Client" Version="4.7.1" />
    <PackageReference Include="Microsoft.NET.Test.Sdk" Version="16.4.0" />
    <PackageReference Include="xunit" Version="2.4.1" />
    <PackageReference Include="xunit.runner.visualstudio" Version="2.4.1">
      <PrivateAssets>all</PrivateAssets>
      <IncludeAssets>runtime; build; native; contentfiles; analyzers</IncludeAssets>
    </PackageReference>
    <PackageReference Include="Microsoft.AspNetCore.Mvc.Testing" Version="3.0.0" />
  </ItemGroup>

  <ItemGroup>
    <ProjectReference Include="..\Joonasw.AadTestingDemo.API\Joonasw.AadTestingDemo.API.csproj" />
  </ItemGroup>

</Project>
A random user secrets id is specified to allow usage of user secrets as part of configuration. I’m using them here so I don’t commit configuration data to GitHub. The values themselves aren’t really secrets, just URLs and identifiers. But I prefer to keep the repo clean. You may choose to use user secrets or just add them to the appsettings.IntegrationTesting.json file in the API project.
Setting up the credentials
To store the credentials required by the tests, I created an Azure Key Vault in my subscription.
There I set up 9 secrets:
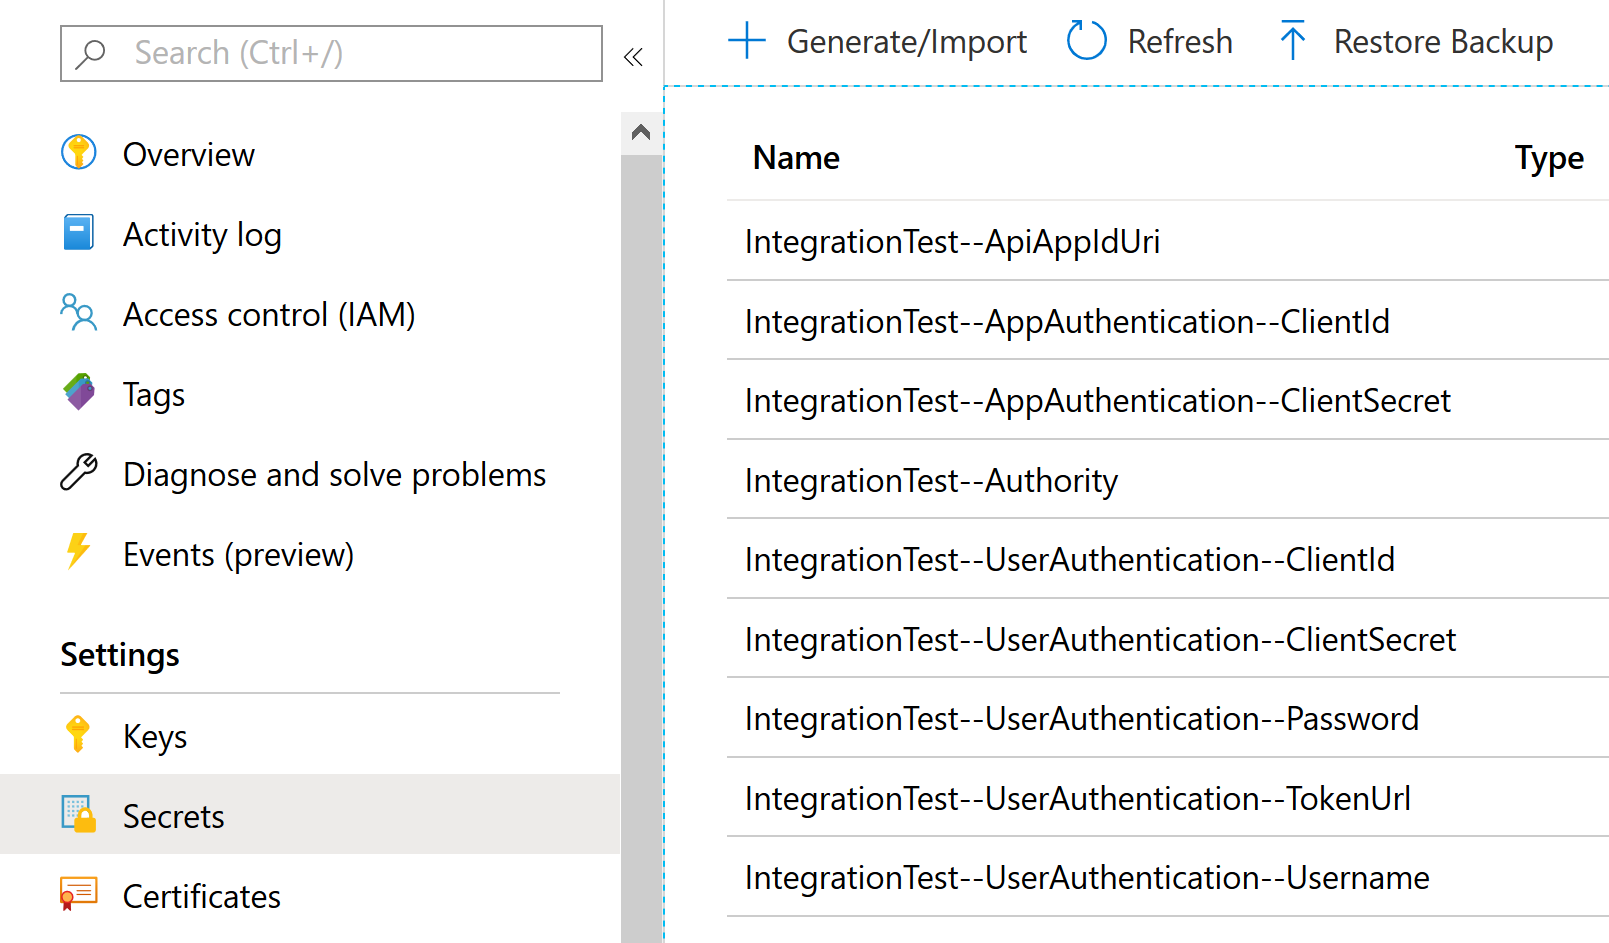
The secrets contain credentials for a test application that has permissions to the API (all application and delegated permissions). There is also the username and password of a cloud-only user in my test Azure AD tenant (where the app registrations are too). Make sure you actually login as the user once to ensure it works.
The Authority specifies the Azure AD tenant to use for app-only authentication,
e.g. https://login.microsoftonline.com/aad-tenant-id-here/v2.0.
ApiAppIdUri is the application ID URI for the API app registration in the test AAD tenant,
e.g. api://api-client-id-here.
TokenUrl is the URL for the token endpoint to use with user authentication,
e.g. https://login.microsoftonline.com/aad-tenant-id-here/oauth2/v2.0/token.
The rest of the settings are the client id and secret of a test app in the test AAD tenant (duplicated for app and user auth), as well as the user credentials.
I also addded 5 user secrets on the test project (right-click project -> Manage user secrets):
{
  "IntegrationTest": {
    "KeyVaultUrl": "https://key-vault-name.vault.azure.net"
  },
  "Authentication": {
    "Authority": "https://login.microsoftonline.com/aad-tenant-id/v2.0",
    "AuthorizationUrl": "https://login.microsoftonline.com/aad-tenant-id/oauth2/v2.0/authorize",
    "ClientId": "api-client-id",
    "ApplicationIdUri": "api-app-id-uri"
  }
}
Here it is mainly to keep the GitHub repo clean, the values aren’t really secrets. You can also specify these settings in appsettings.IntegrationTesting.json.
If you are using Visual Studio, you can then setup the user account to use through Tools -> Options -> Azure Service Authentication. If you are not using VS, you can login to the cross-platform AZ CLI, and ensure you have the correct Azure AD tenant active there.
This user account will be used to access the Key Vault, so ensure it has access through a Key Vault access policy.
Running the API in-memory
Setting up the API to run in-memory is done in the AppFixture class. This is the important bit:
public AppFixture()
{
    _webAppFactory = new WebApplicationFactory<Startup>()
        .WithWebHostBuilder(builder =>
        {
            builder.UseEnvironment("IntegrationTesting");
            builder.ConfigureAppConfiguration(configBuilder =>
            {
                // Adds user secrets for the integration test project
                // Contains the Key Vault URL and API authentication settings for me
                configBuilder.AddUserSecrets<AppFixture>();

                // Build temporary config, get Key Vault URL, add Key Vault as config source
                var config = configBuilder.Build();
                string keyVaultUrl = config["IntegrationTest:KeyVaultUrl"];
                if (!string.IsNullOrEmpty(keyVaultUrl))
                {
                    // This will use Managed Identity / local user authentication
                    // For this to work in a CI pipeline,
                    // you will need to somehow pass in a client id + client secret
                    // and use a different overload that takes those.
                    // Locally doing this is better though.
                    configBuilder.AddAzureKeyVault(keyVaultUrl);
                    config = configBuilder.Build();
                }

                Settings = config.GetSection("IntegrationTest").Get<IntegrationTestSettings>();
            });
        });
    Client = _webAppFactory.CreateDefaultClient();
}
This configuration does many things:
- Sets the environment as IntegrationTesting so the correct configuration file is used
- Adds user secrets from test project to the configuration
- Adds Azure Key Vault as configuration provider if a URL is given
The Key Vault configuration provider will use AzureServiceTokenProvider internally to get tokens.
This overload that only takes the Key Vault URL will use the token provider with no arguments,
meaning it will attempt to use Managed Identity as well as local user authentication.
When we run the tests locally, our user account will be used to access Key Vault.
Getting access tokens
If you try to run requests against the API now from tests, they should fail with a 401. To call the API, we need access tokens. In this app, there is an AccessTokenProvider class to help with this. In its constructor, an MSAL application is setup:
private readonly IntegrationTestSettings _settings;
private readonly IConfidentialClientApplication _confidentialClientApp;
private readonly HttpClient _client;

public AccessTokenProvider(IntegrationTestSettings settings)
{
    _settings = settings;
    _confidentialClientApp = ConfidentialClientApplicationBuilder
        .Create(settings.AppAuthentication.ClientId)
        .WithClientSecret(settings.AppAuthentication.ClientSecret)
        .WithAuthority(settings.Authority)
        .Build();
    _client = new HttpClient();
}
This application is used for client credentials/app-only authentication:
public async Task AuthenticateRequestAsAppAsync(HttpRequestMessage req)
{
    var scopes = new[] { $"{_settings.ApiAppIdUri}/.default" };
    var result = await _confidentialClientApp.AcquireTokenForClient(scopes).ExecuteAsync();
    req.Headers.Authorization = new AuthenticationHeaderValue("Bearer", result.AccessToken);
}
To authenticate a request as a user, we need to call the token endpoint manually:
public async Task AuthenticateRequestAsUserAsync(HttpRequestMessage req)
{
    var tokenReq = new HttpRequestMessage(HttpMethod.Post, _settings.UserAuthentication.TokenUrl)
    {
        Content = new FormUrlEncodedContent(new Dictionary<string, string>
        {
            ["grant_type"] = "password",
            ["username"] = _settings.UserAuthentication.Username,
            ["password"] = _settings.UserAuthentication.Password,
            ["client_id"] = _settings.UserAuthentication.ClientId,
            ["client_secret"] = _settings.UserAuthentication.ClientSecret,
            ["scope"] = $"{_settings.ApiAppIdUri}/.default"
        })
    };

    var res = await _client.SendAsync(tokenReq);

    string json = await res.Content.ReadAsStringAsync();
    var tokenResponse = JsonConvert.DeserializeObject<TokenResponse>(json);

    req.Headers.Authorization = new AuthenticationHeaderValue("Bearer", tokenResponse.AccessToken);
}
With this class as support, we can then move to writing tests.
Writing tests
You can see some example tests in the ThingsTests class. It inherits from an IntegrationTestBase class that I made, which connects the test class to the Integration collection and sets up some useful properties.
We can now make tests that ensure requests without authentication fail:
[Theory]
[InlineData("/Things")]
[InlineData("/Things/other")]
public async Task CallWithoutAuthenticationFails(string url)
{
    var req = new HttpRequestMessage(HttpMethod.Get, url);

    var res = await Client.SendAsync(req);

    Assert.Equal(HttpStatusCode.Unauthorized, res.StatusCode);
}
Or run requests as the test user:
[Theory]
[InlineData("/Things")]
[InlineData("/Things/other")]
public async Task CallWithUserAuthenticationSucceeds(string url)
{
    var req = new HttpRequestMessage(HttpMethod.Get, url);
    await AccessTokenProvider.AuthenticateRequestAsUserAsync(req);

    var res = await Client.SendAsync(req);

    Assert.Equal(HttpStatusCode.OK, res.StatusCode);
}
Or run requests as an app:
[Theory]
[InlineData("/Things")]
[InlineData("/Things/other")]
public async Task CallWithAppAuthenticationSucceeds(string url)
{
    var req = new HttpRequestMessage(HttpMethod.Get, url);
    await AccessTokenProvider.AuthenticateRequestAsAppAsync(req);

    var res = await Client.SendAsync(req);

    Assert.Equal(HttpStatusCode.OK, res.StatusCode);
}
Now it is quite straightforward to write tests. We only need to add one line of code to authenticate the request as the user / app.
You should be able to run the tests locally, assuming the Key Vault URL and API authentication settings are setup correctly. If authentication to Key Vault fails, ensure the user you setup in Visual Studio options or logged into AZ CLI as has access to the Key Vault through an access policy. Sometimes you may also need to redo the Visual Studio user setup.
Summary
As a TL;DR:
- Setup secrets in Key Vault (user credentials, app credentials)
- Setup integration test configuration (Key Vault URL, API authentication settings, add Key Vault secrets to app config)
- Set the user to use for Key Vault authentication in Visual Studio / AZ CLI
- Authenticate requests in testing with client credentials for app-only calls
- Authenticate requests with ROPC for calls as a user
Some hoops to jump through, but at the end it makes writing tests that authenticate the same as production quite an okay experience. Testing different scopes is not very easy though. It might require registering different test applications with different scopes granted to them. Testing requests with different users is definitely possible. If your API has user roles, you can make a test user for each role, assign them the role, and authenticate with the different users to verify they can only do what their role allows them to do.
There was definitely room to make this article even more detailed, but I felt it was long enough. If anything is not clear to you, please leave a comment :)
Next time, we will look at using GitHub Actions to run these tests.